> ## Documentation Index
> Fetch the complete documentation index at: https://sorank.com/llms.txt
> Use this file to discover all available pages before exploring further.
# Configura tu blog de Webflow
> Doc Sorank - Configurar tu blog de Webflow
Sigue estos pasos para crear una colección de blog en tu sitio Webflow y conectarla a Sorank para que los artículos se publiquen directamente en tu CMS.
## Paso 1: Abre el panel CMS
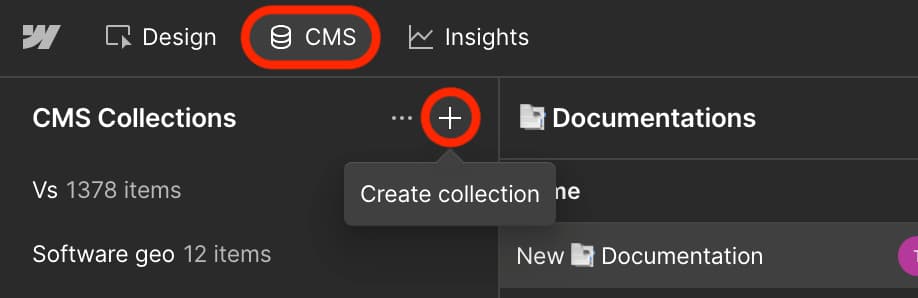
Abre tu Webflow Designer. Haz clic en **CMS** en la barra de navegación superior. Haz clic en el botón **+** junto a "CMS Collections". Selecciona **Create collection**.
 ## Paso 2: Crea una colección de blog
En el cuadro de diálogo "New Collection", haz clic en la plantilla **Blog Posts**. Establece el Collection Name como **Blog**. La URL se convierte en **/blog** automáticamente. Haz clic en **Create Collection**.
## Paso 2: Crea una colección de blog
En el cuadro de diálogo "New Collection", haz clic en la plantilla **Blog Posts**. Establece el Collection Name como **Blog**. La URL se convierte en **/blog** automáticamente. Haz clic en **Create Collection**.
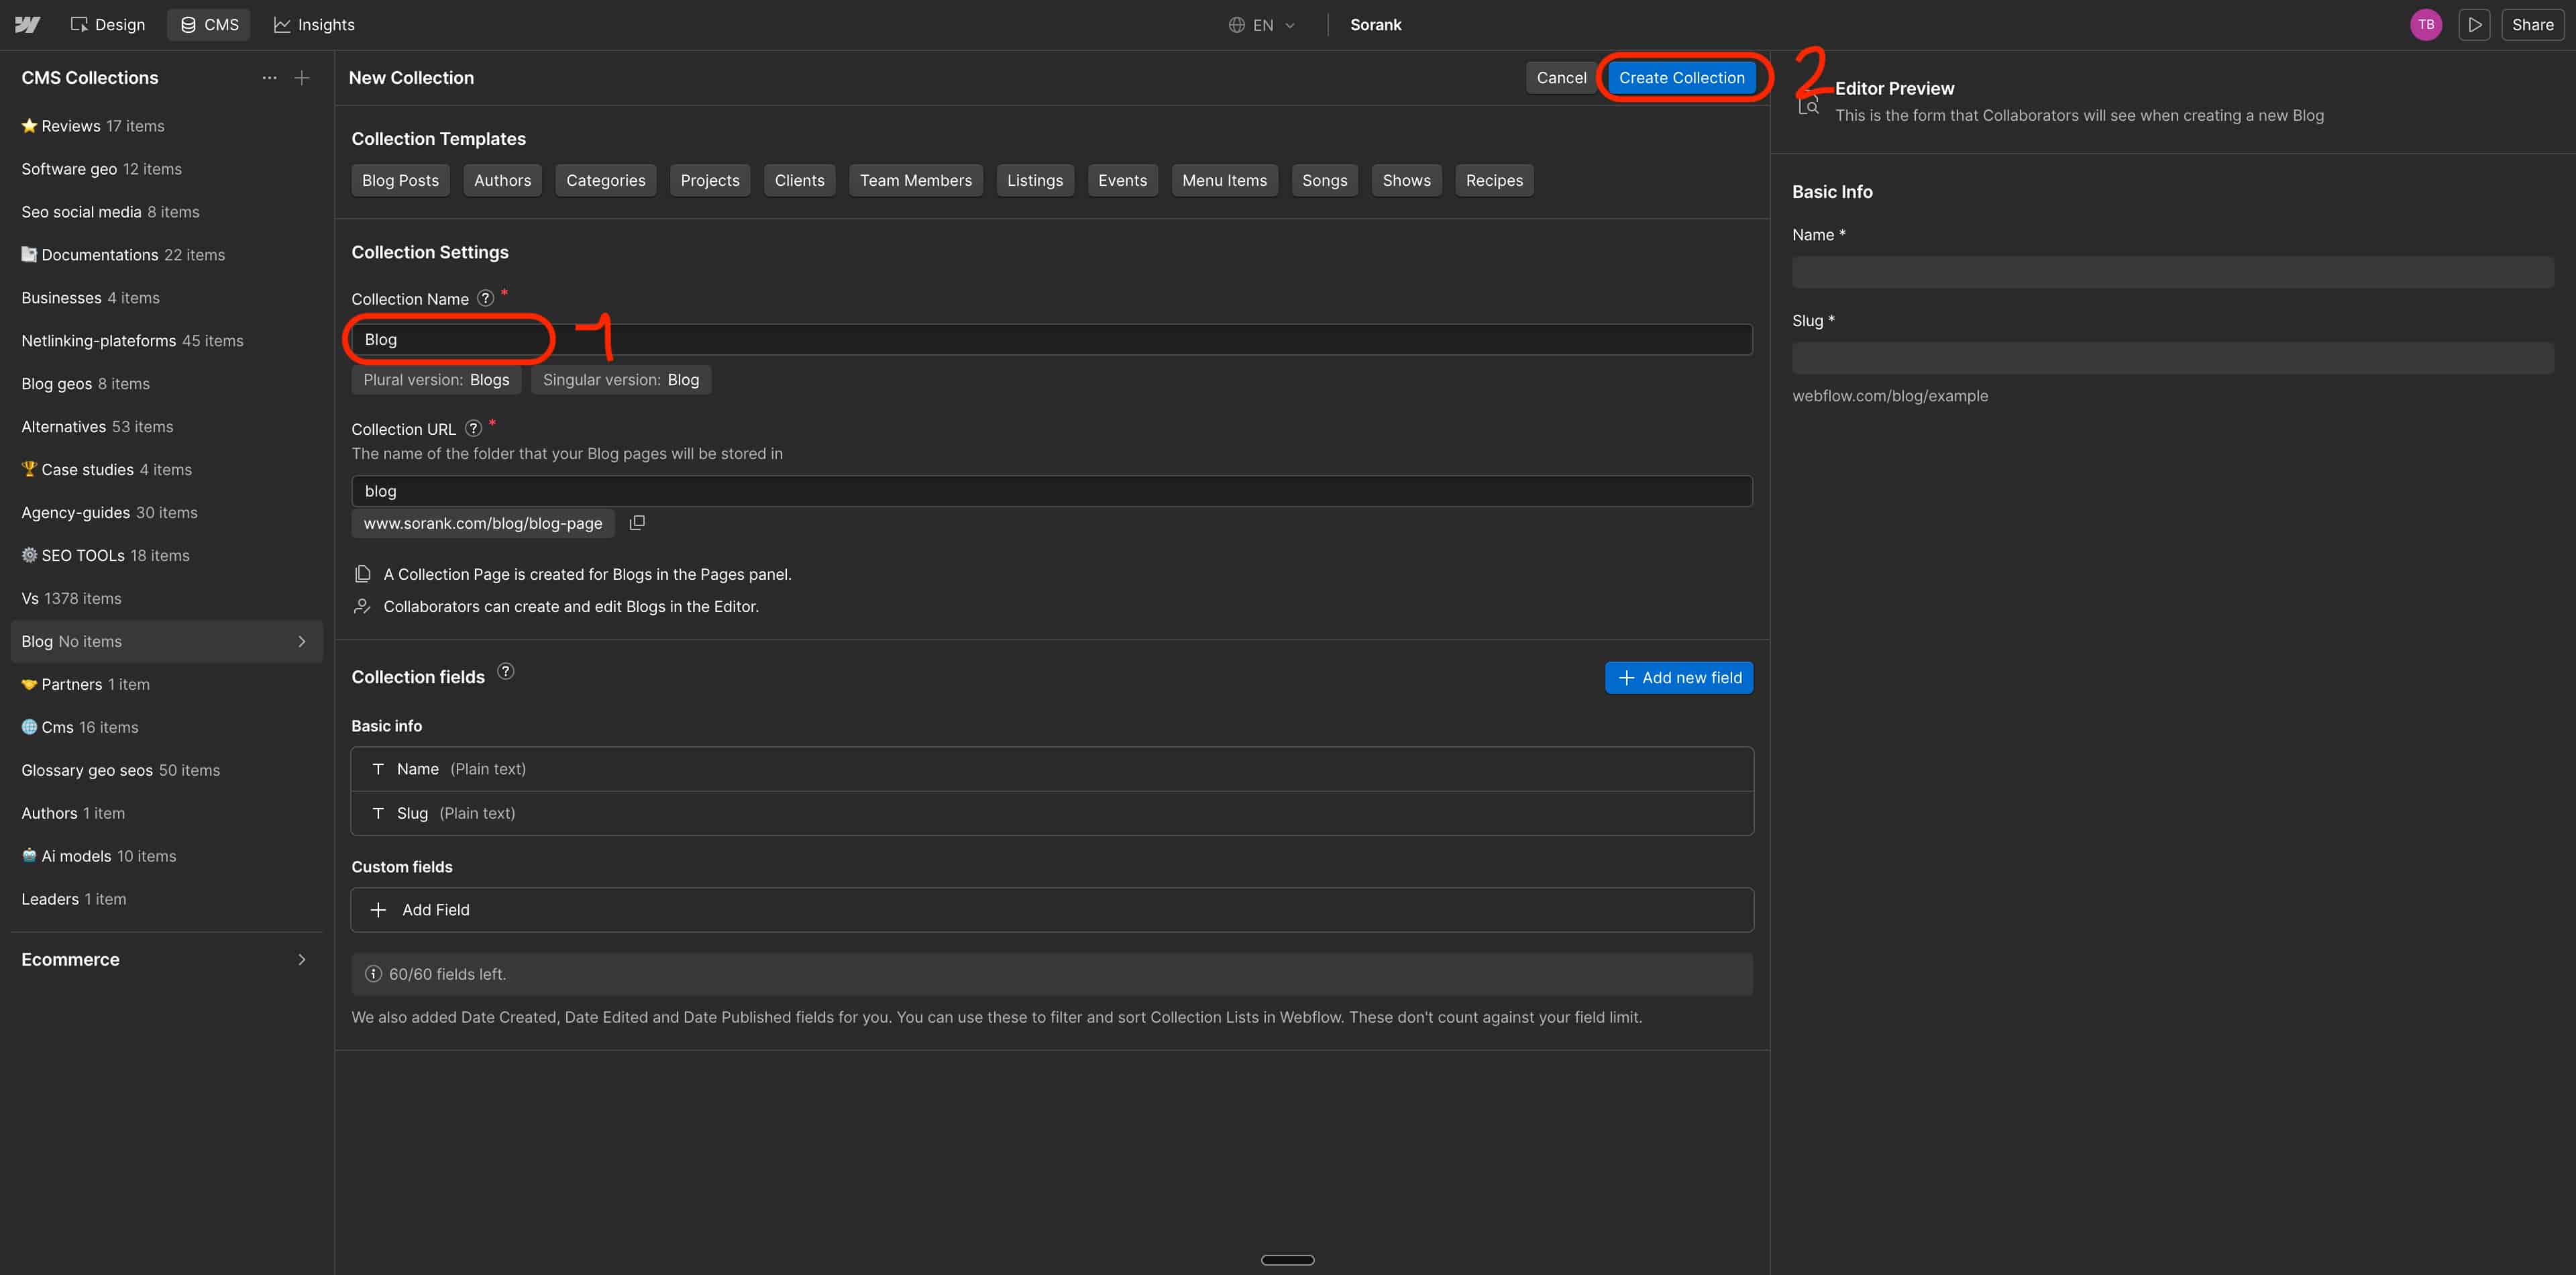 ⚠️ El nombre de la colección debe ser exactamente **Blog**. Sorank usa este nombre para identificar tu colección.
## Paso 3: Añade los campos personalizados necesarios
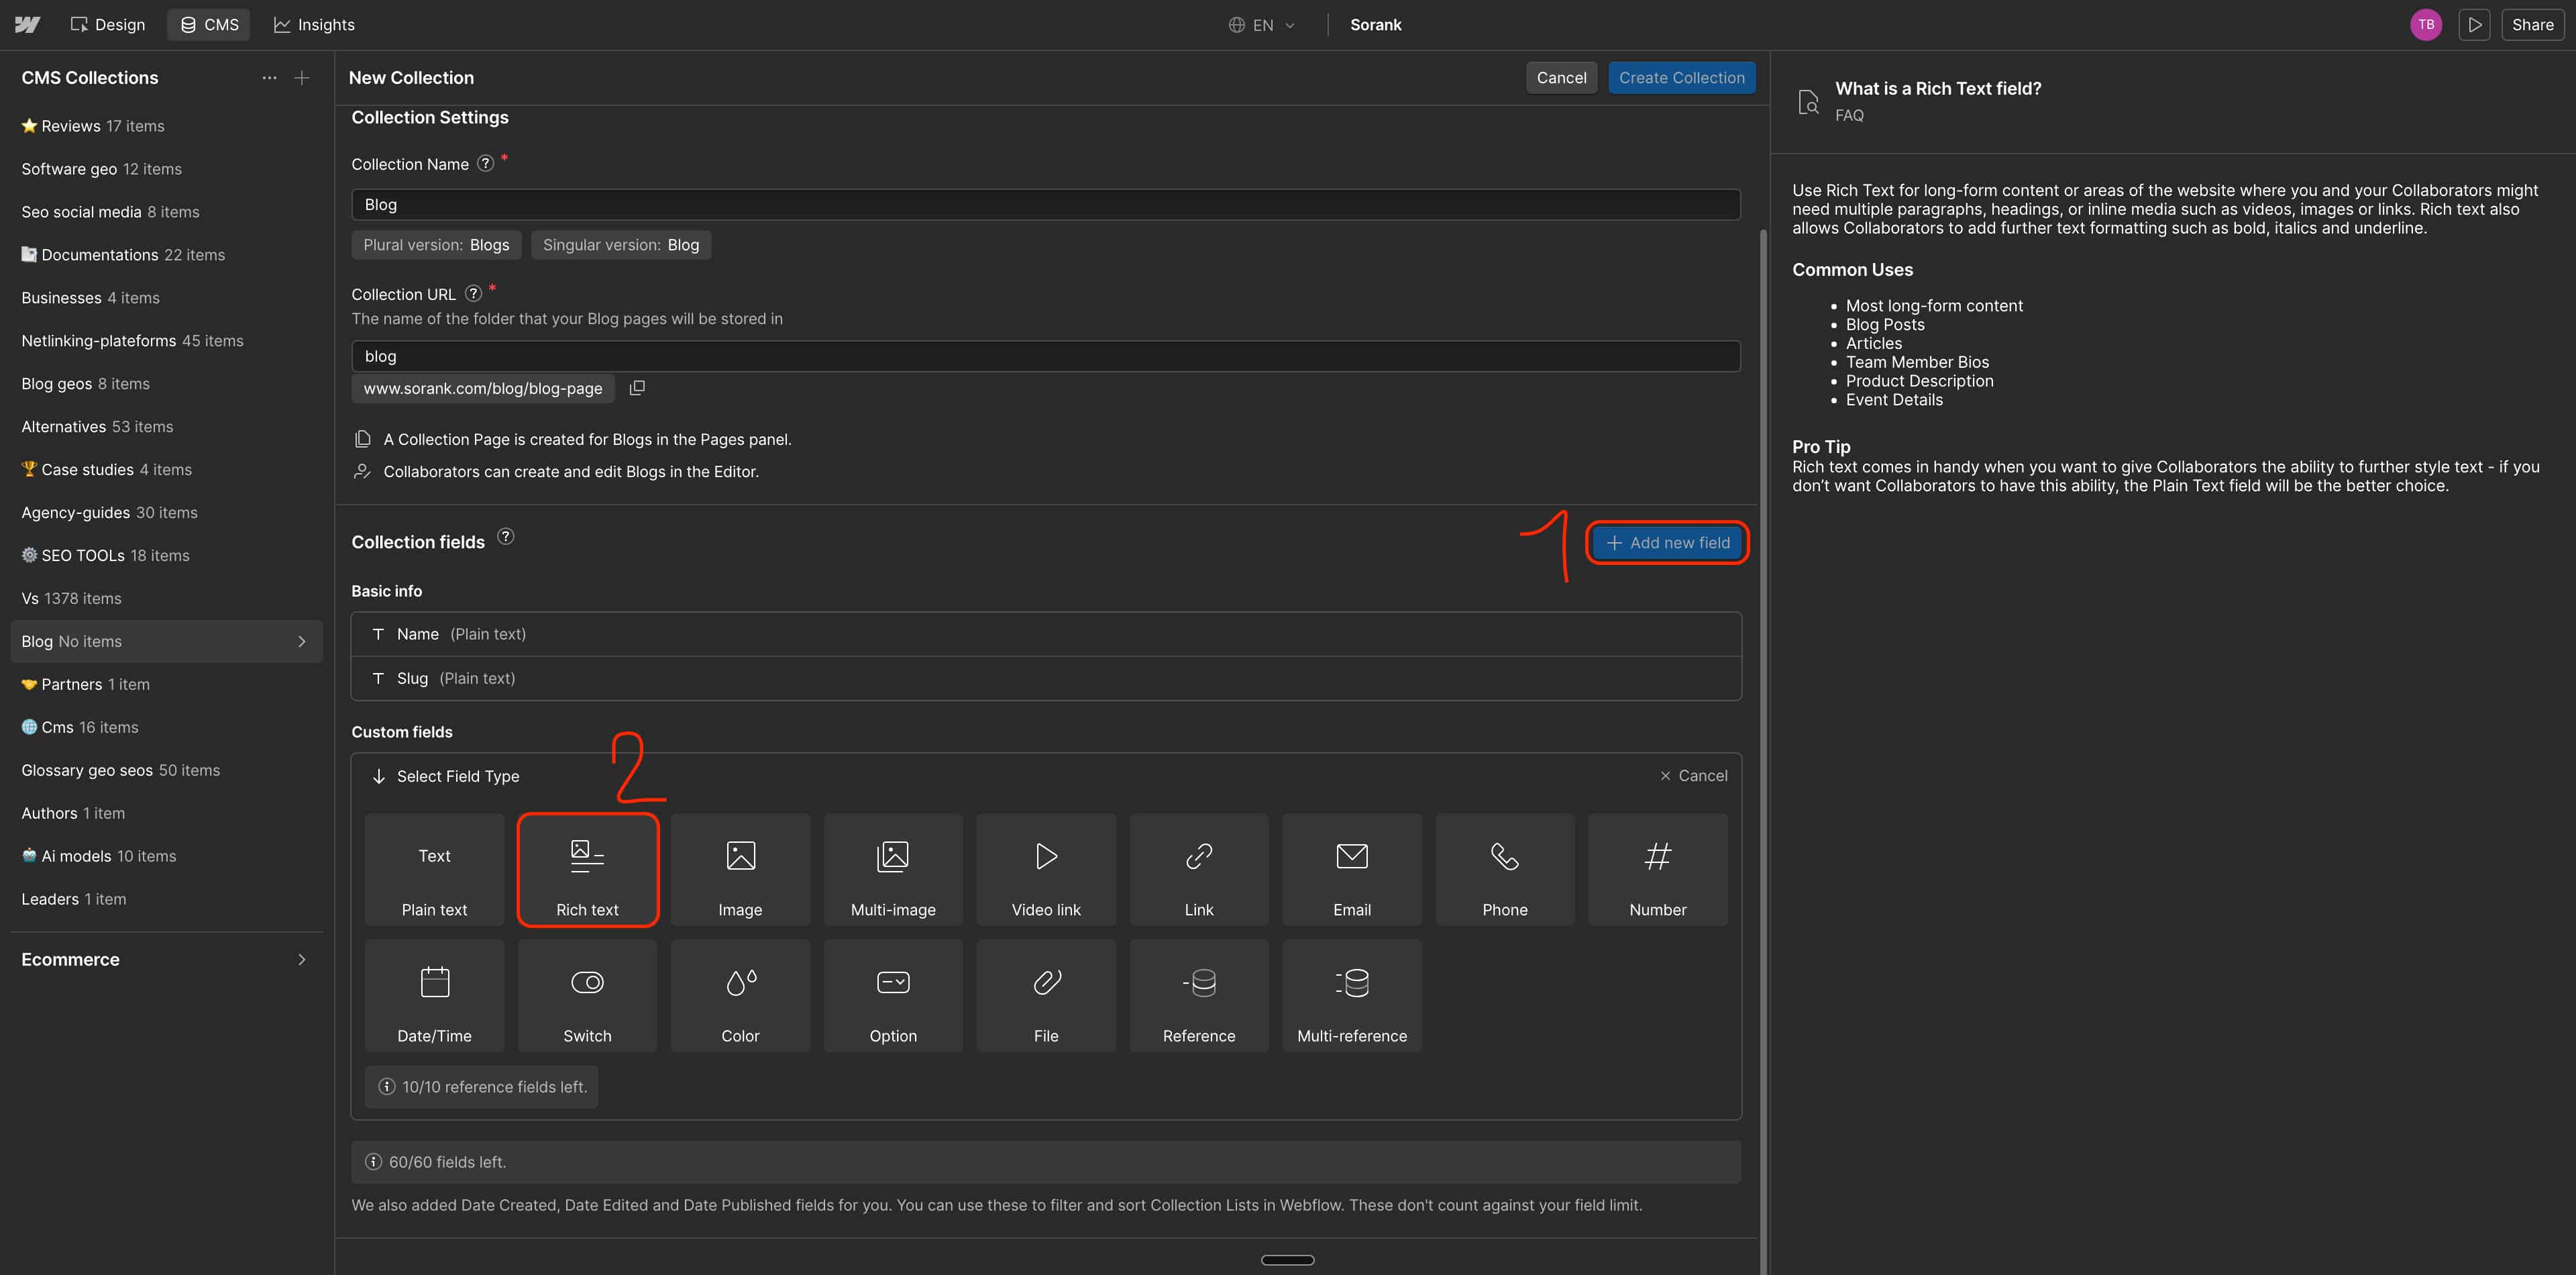
Haz clic en **+ Add new field**. Necesitas crear 3 campos personalizados uno por uno.
### Campo 1: Post body
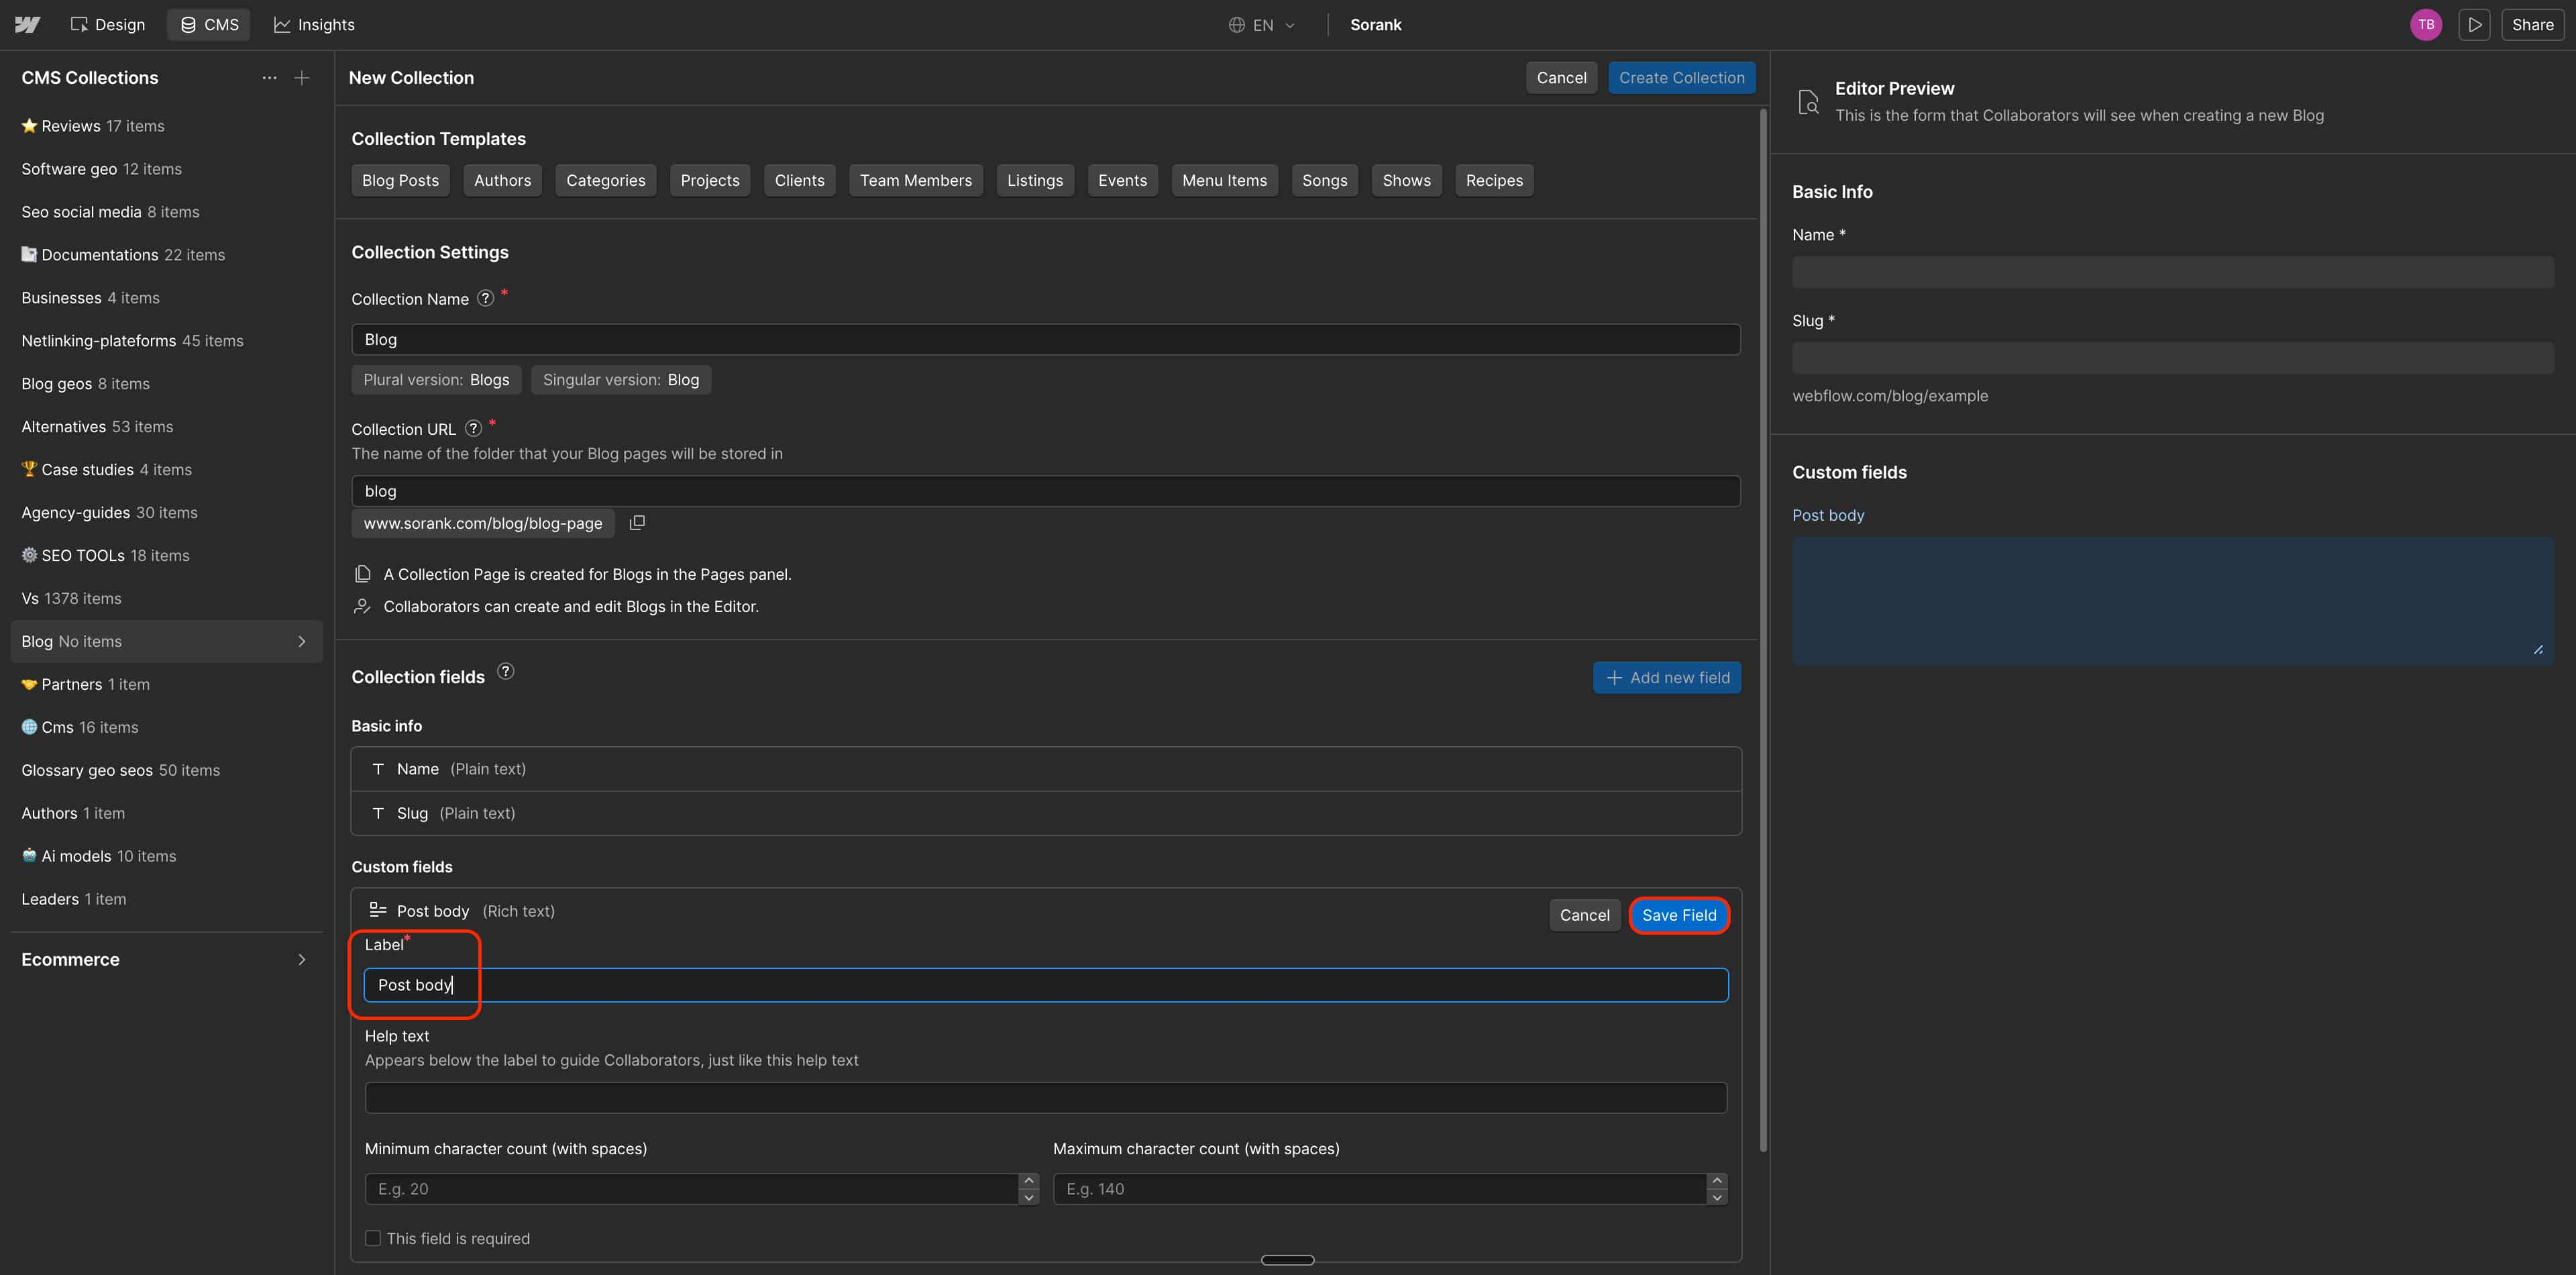
Haz clic en **+ Add new field**. Selecciona **Rich text**. Nómbralo **Post body**. Haz clic en **Save Field**.
⚠️ El nombre de la colección debe ser exactamente **Blog**. Sorank usa este nombre para identificar tu colección.
## Paso 3: Añade los campos personalizados necesarios
Haz clic en **+ Add new field**. Necesitas crear 3 campos personalizados uno por uno.
### Campo 1: Post body
Haz clic en **+ Add new field**. Selecciona **Rich text**. Nómbralo **Post body**. Haz clic en **Save Field**.
 ### Campo 2: Image
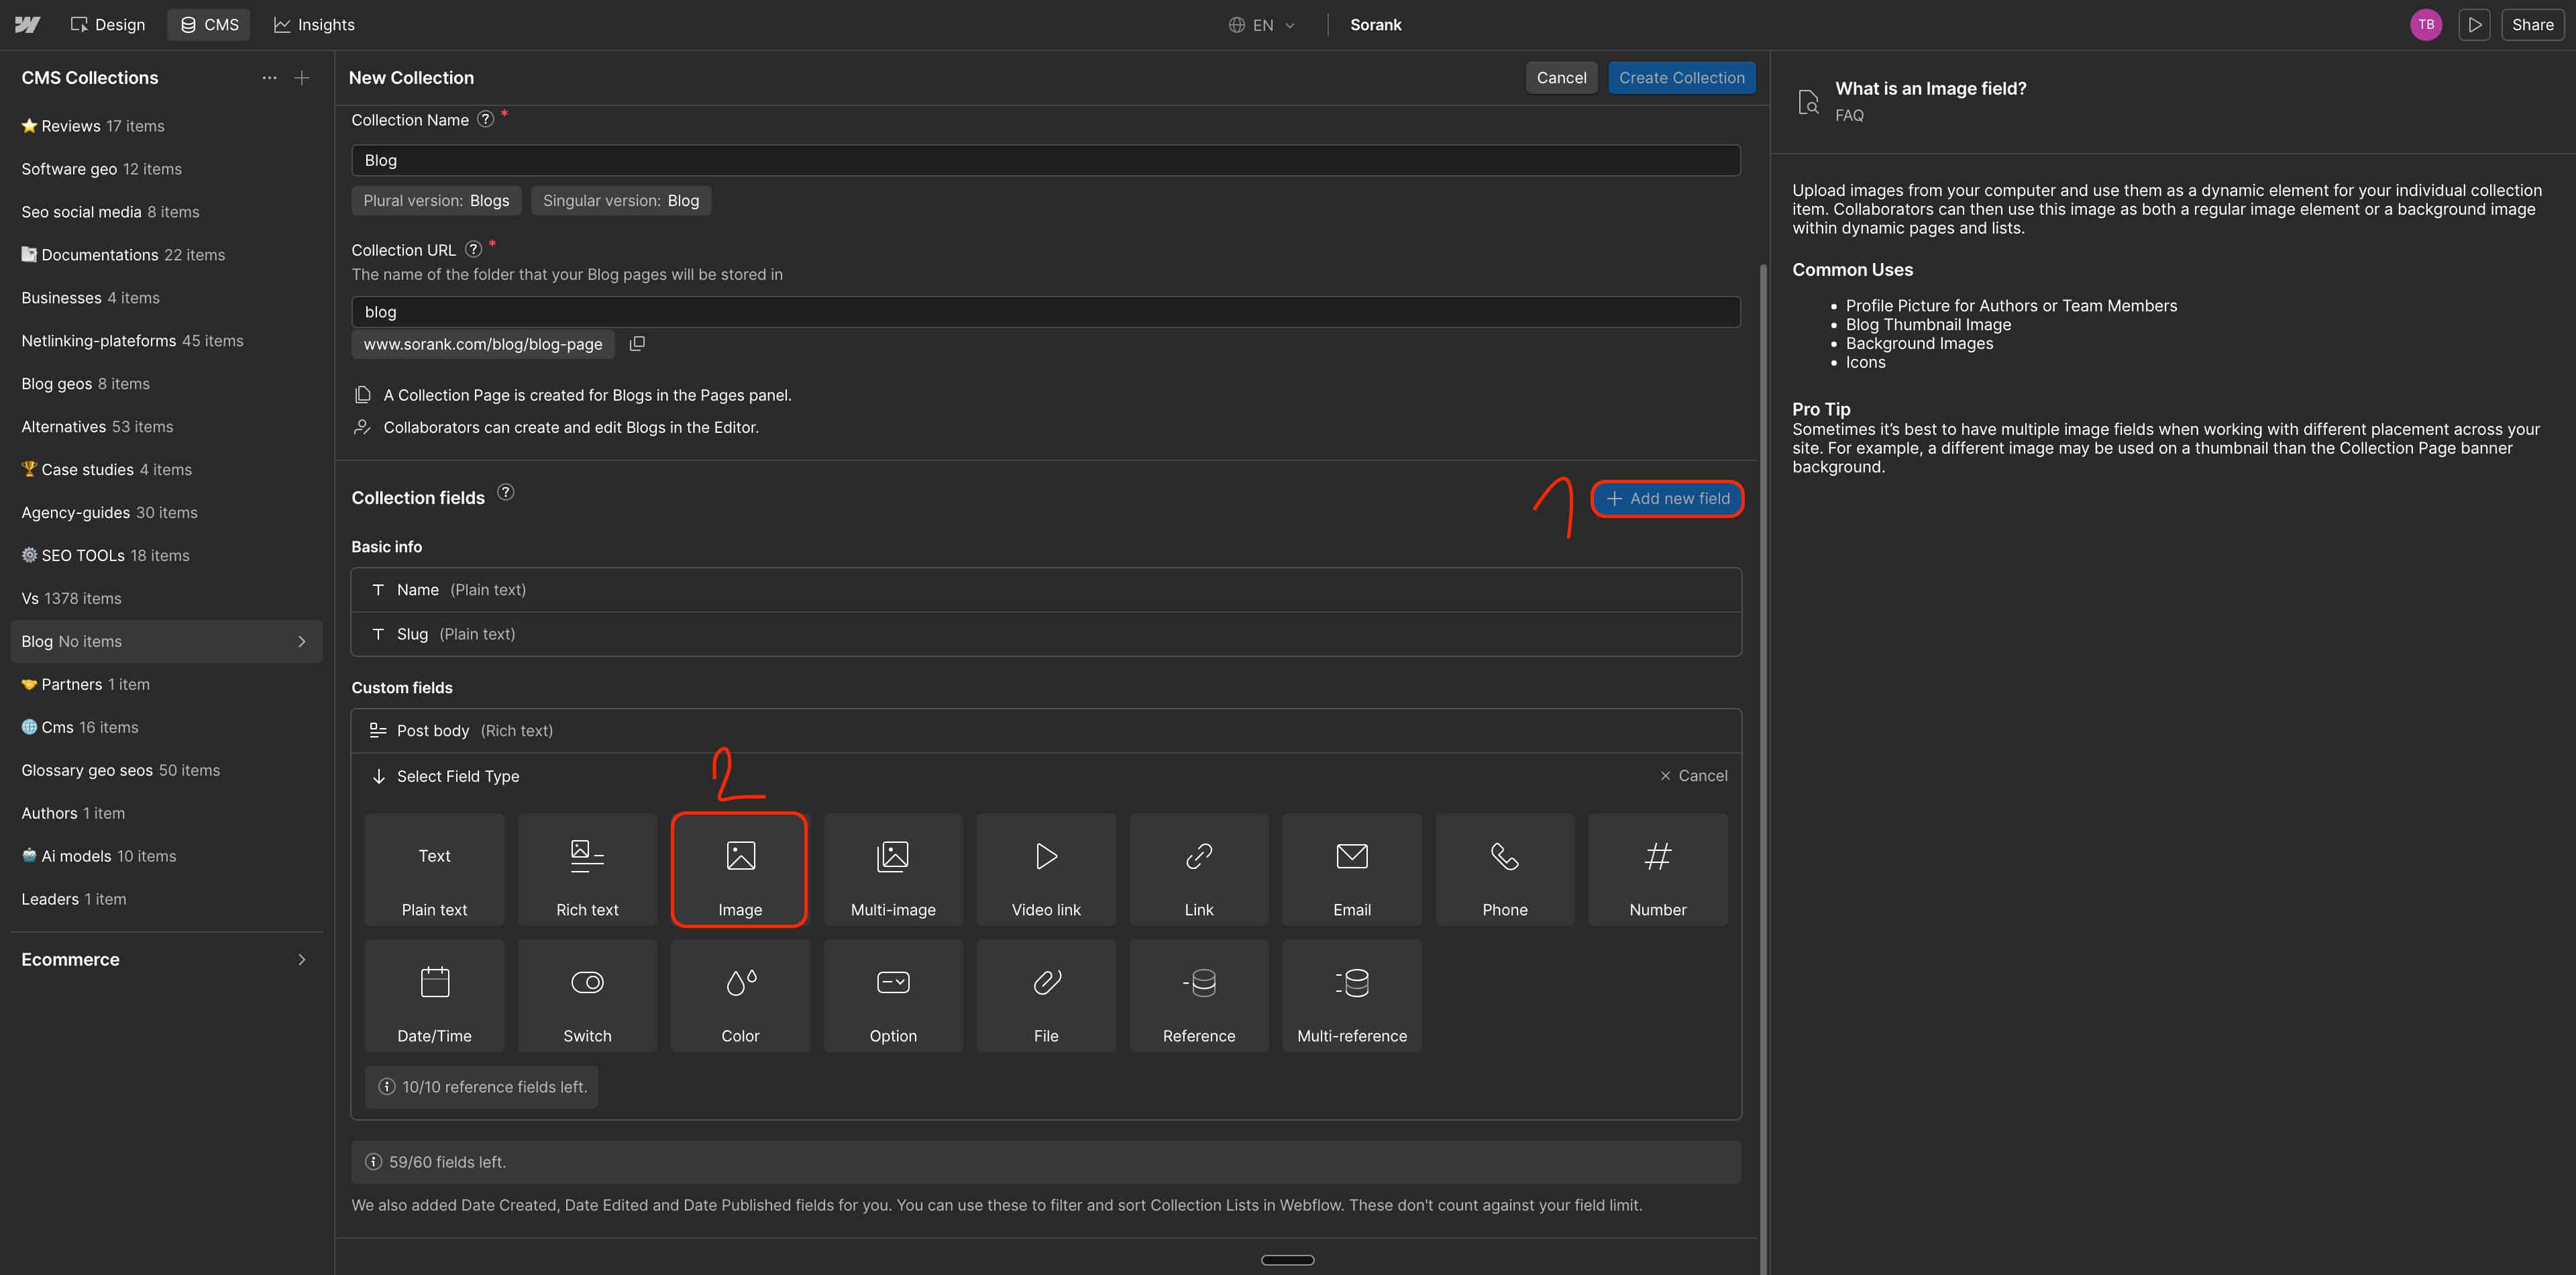
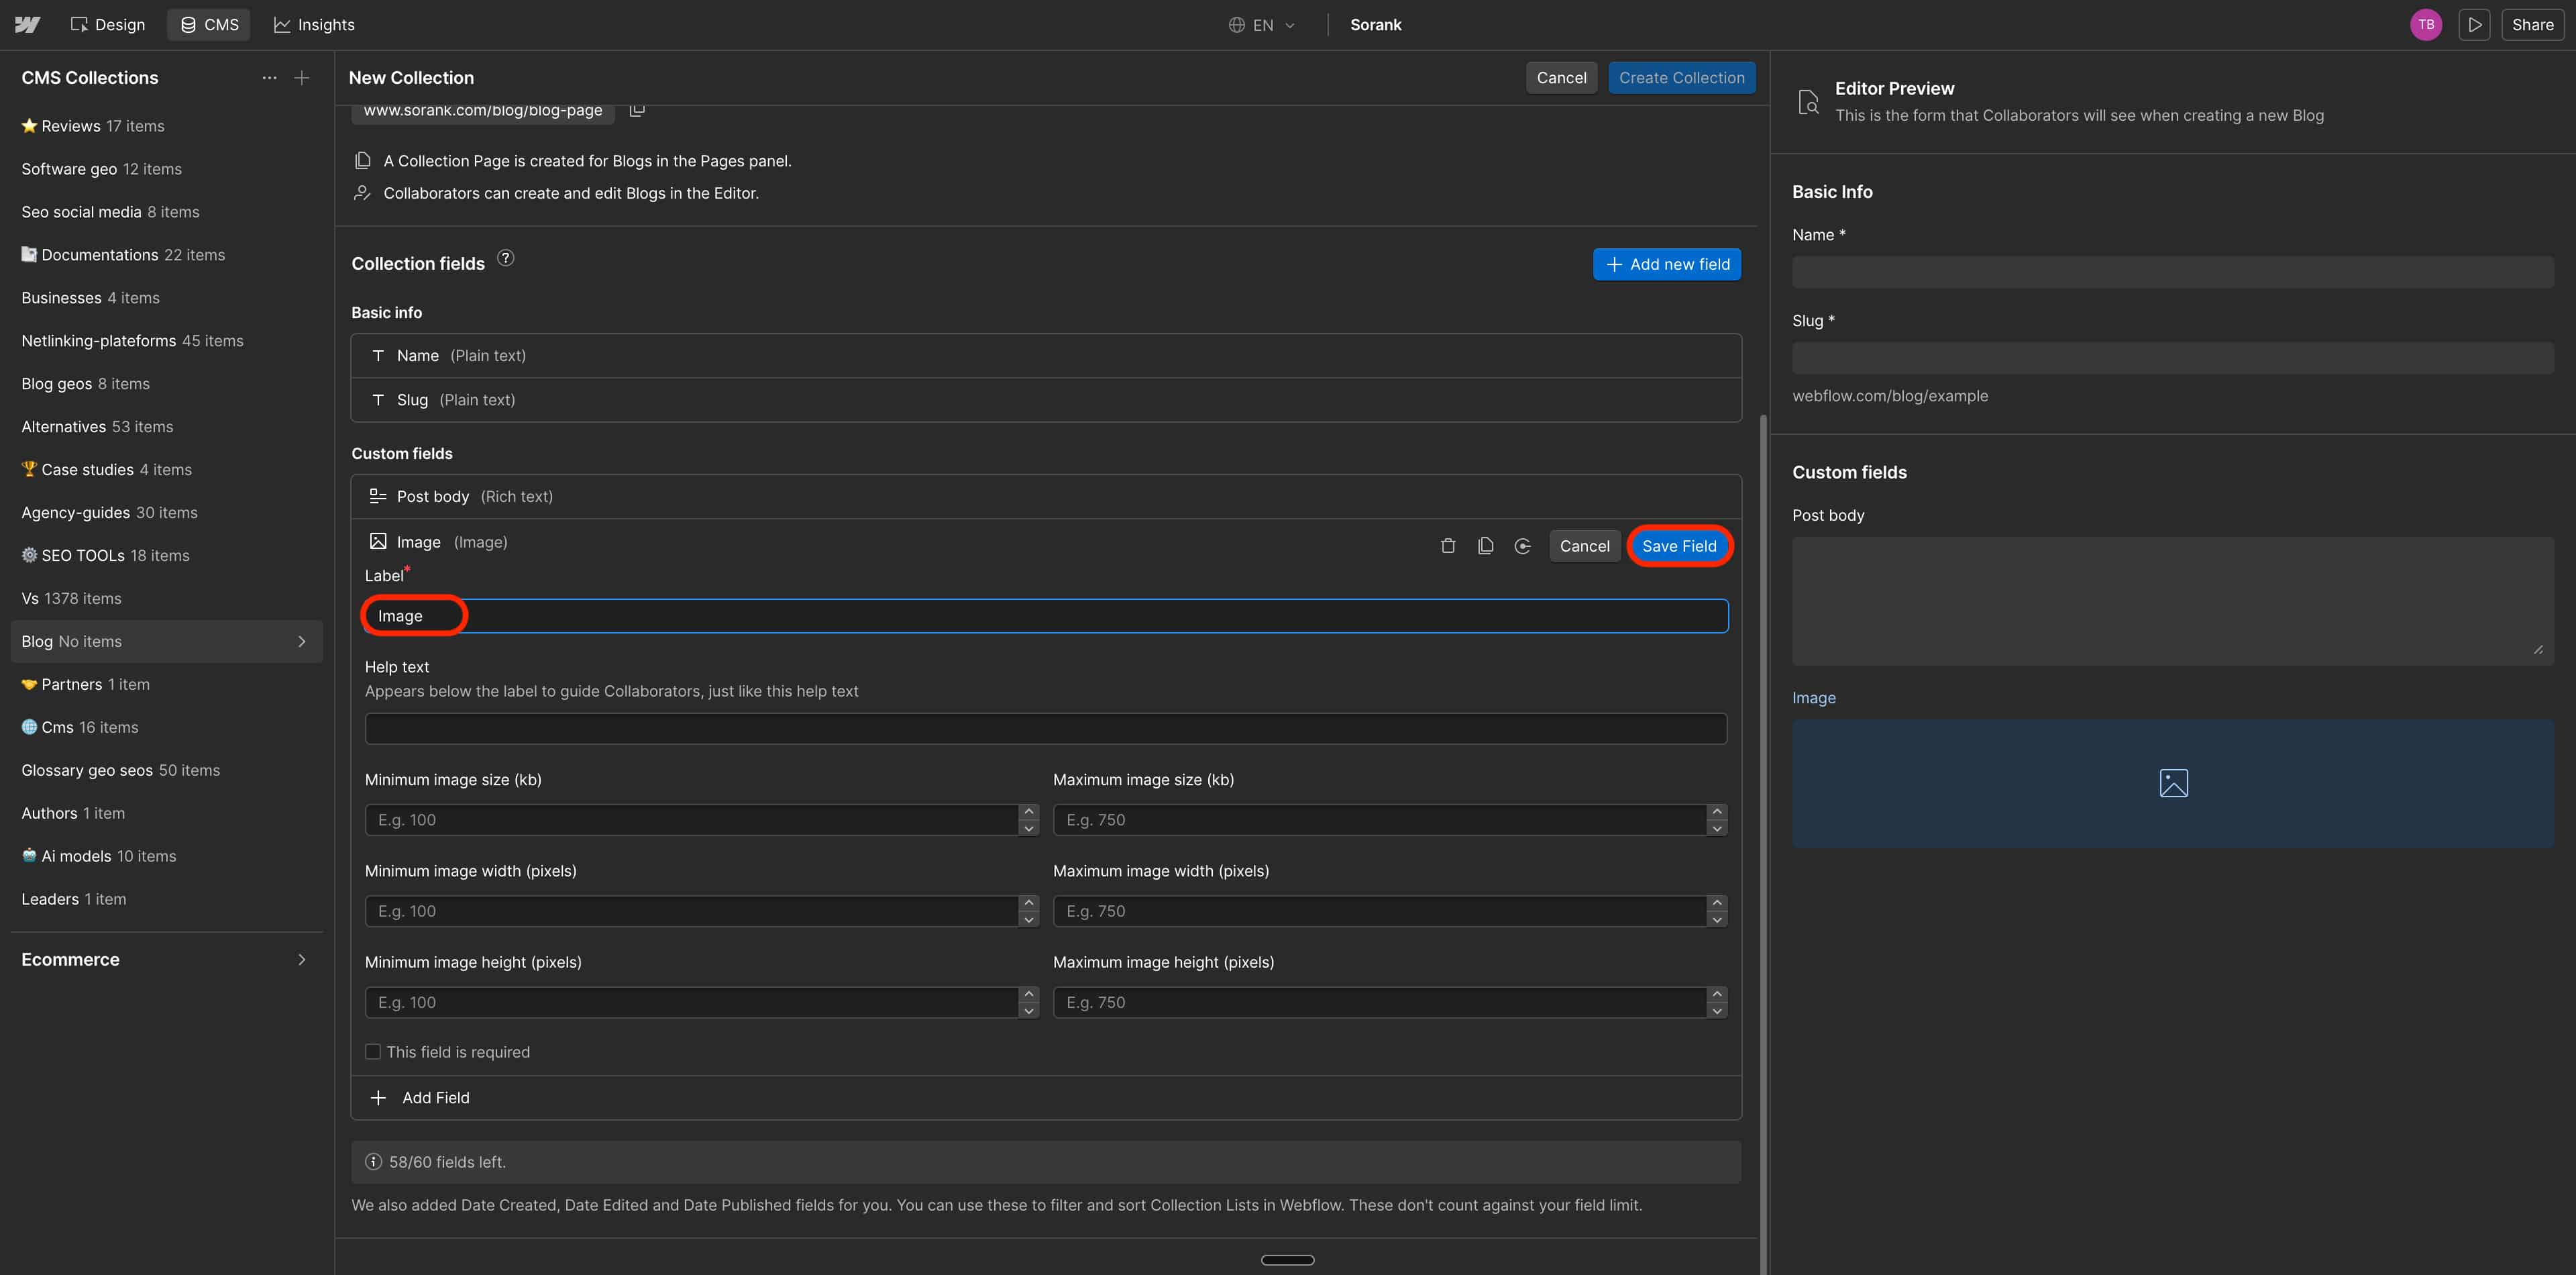
Haz clic de nuevo en **+ Add new field**. Selecciona **Image**. Nómbralo **Image**. Haz clic en **Save Field**.
### Campo 2: Image
Haz clic de nuevo en **+ Add new field**. Selecciona **Image**. Nómbralo **Image**. Haz clic en **Save Field**.
 ### Campo 3: Metadescription
Haz clic de nuevo en **+ Add new field**. Selecciona **Plain text**. Nómbralo **Metadescription**. Establece el tipo de campo de texto en **Multiple line**. Haz clic en **Save Field**.
### Campo 3: Metadescription
Haz clic de nuevo en **+ Add new field**. Selecciona **Plain text**. Nómbralo **Metadescription**. Establece el tipo de campo de texto en **Multiple line**. Haz clic en **Save Field**.
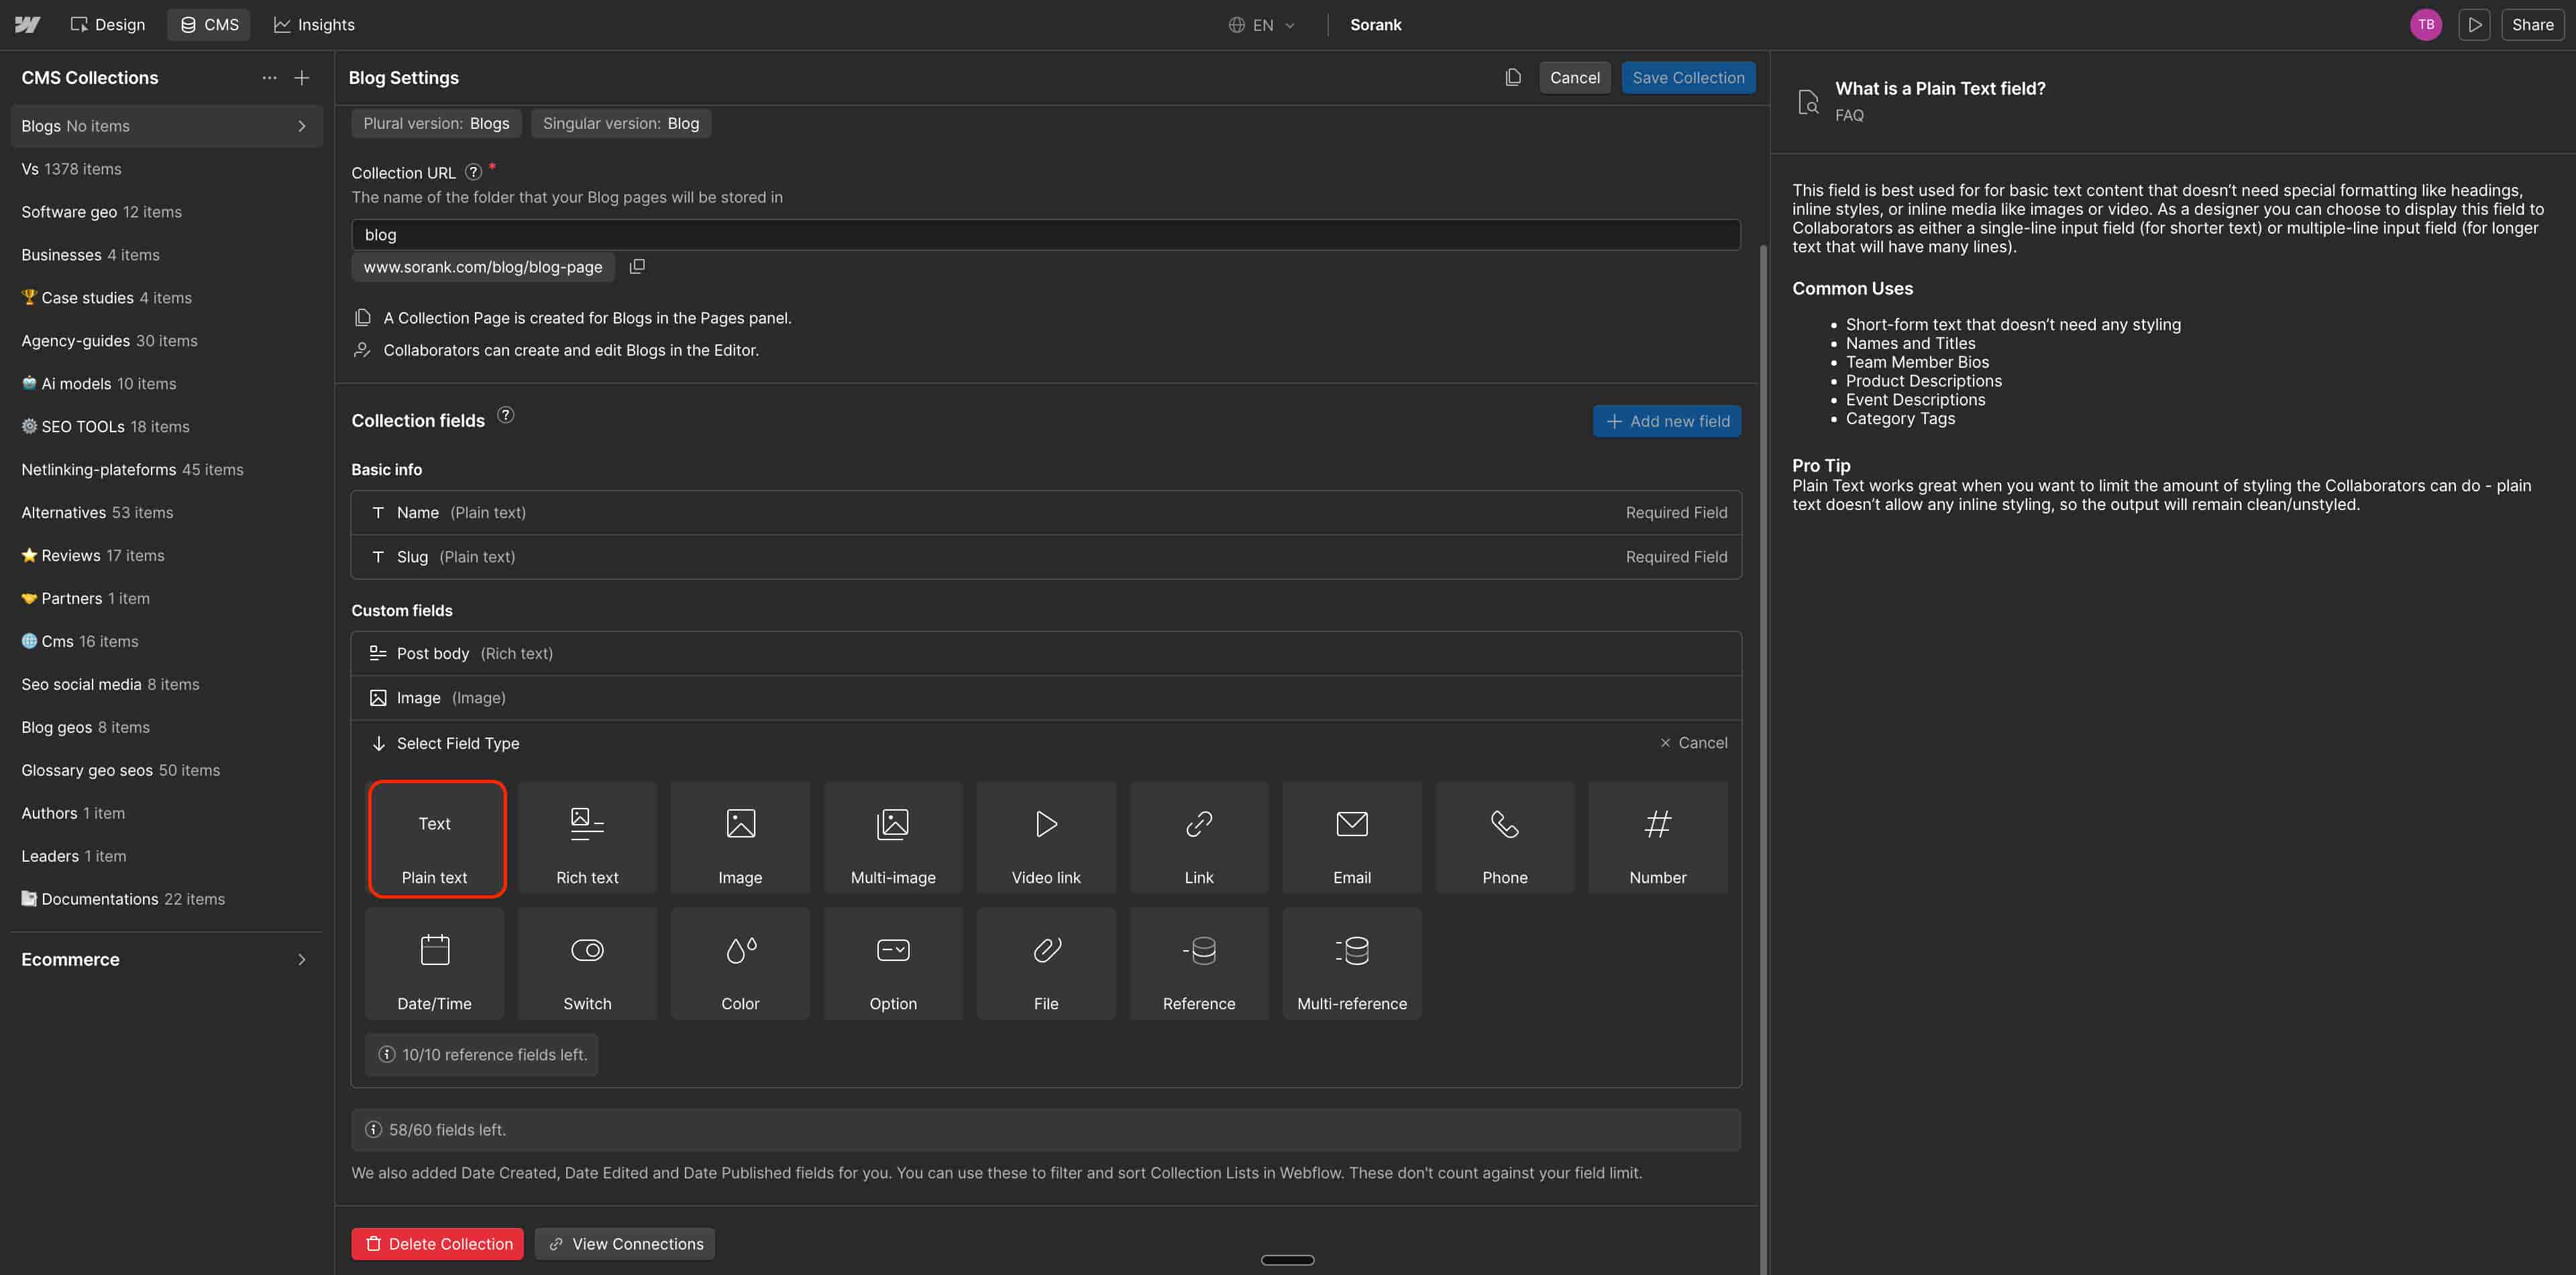 Haz clic en **Save Collection**. Los campos **Name** y **Slug** se crean por defecto. No los elimines.
## Paso 4: Configura los ajustes de SEO en la página de plantilla del blog
Haz clic en el icono **Pages** en la parte superior izquierda del Designer. En "CMS collection pages", haz clic en **Blog geos Template**. En el panel derecho, ve a **Settings**. Desplázate hacia abajo hasta **SEO settings**.
Haz clic en **Save Collection**. Los campos **Name** y **Slug** se crean por defecto. No los elimines.
## Paso 4: Configura los ajustes de SEO en la página de plantilla del blog
Haz clic en el icono **Pages** en la parte superior izquierda del Designer. En "CMS collection pages", haz clic en **Blog geos Template**. En el panel derecho, ve a **Settings**. Desplázate hacia abajo hasta **SEO settings**.
 ### Title tag
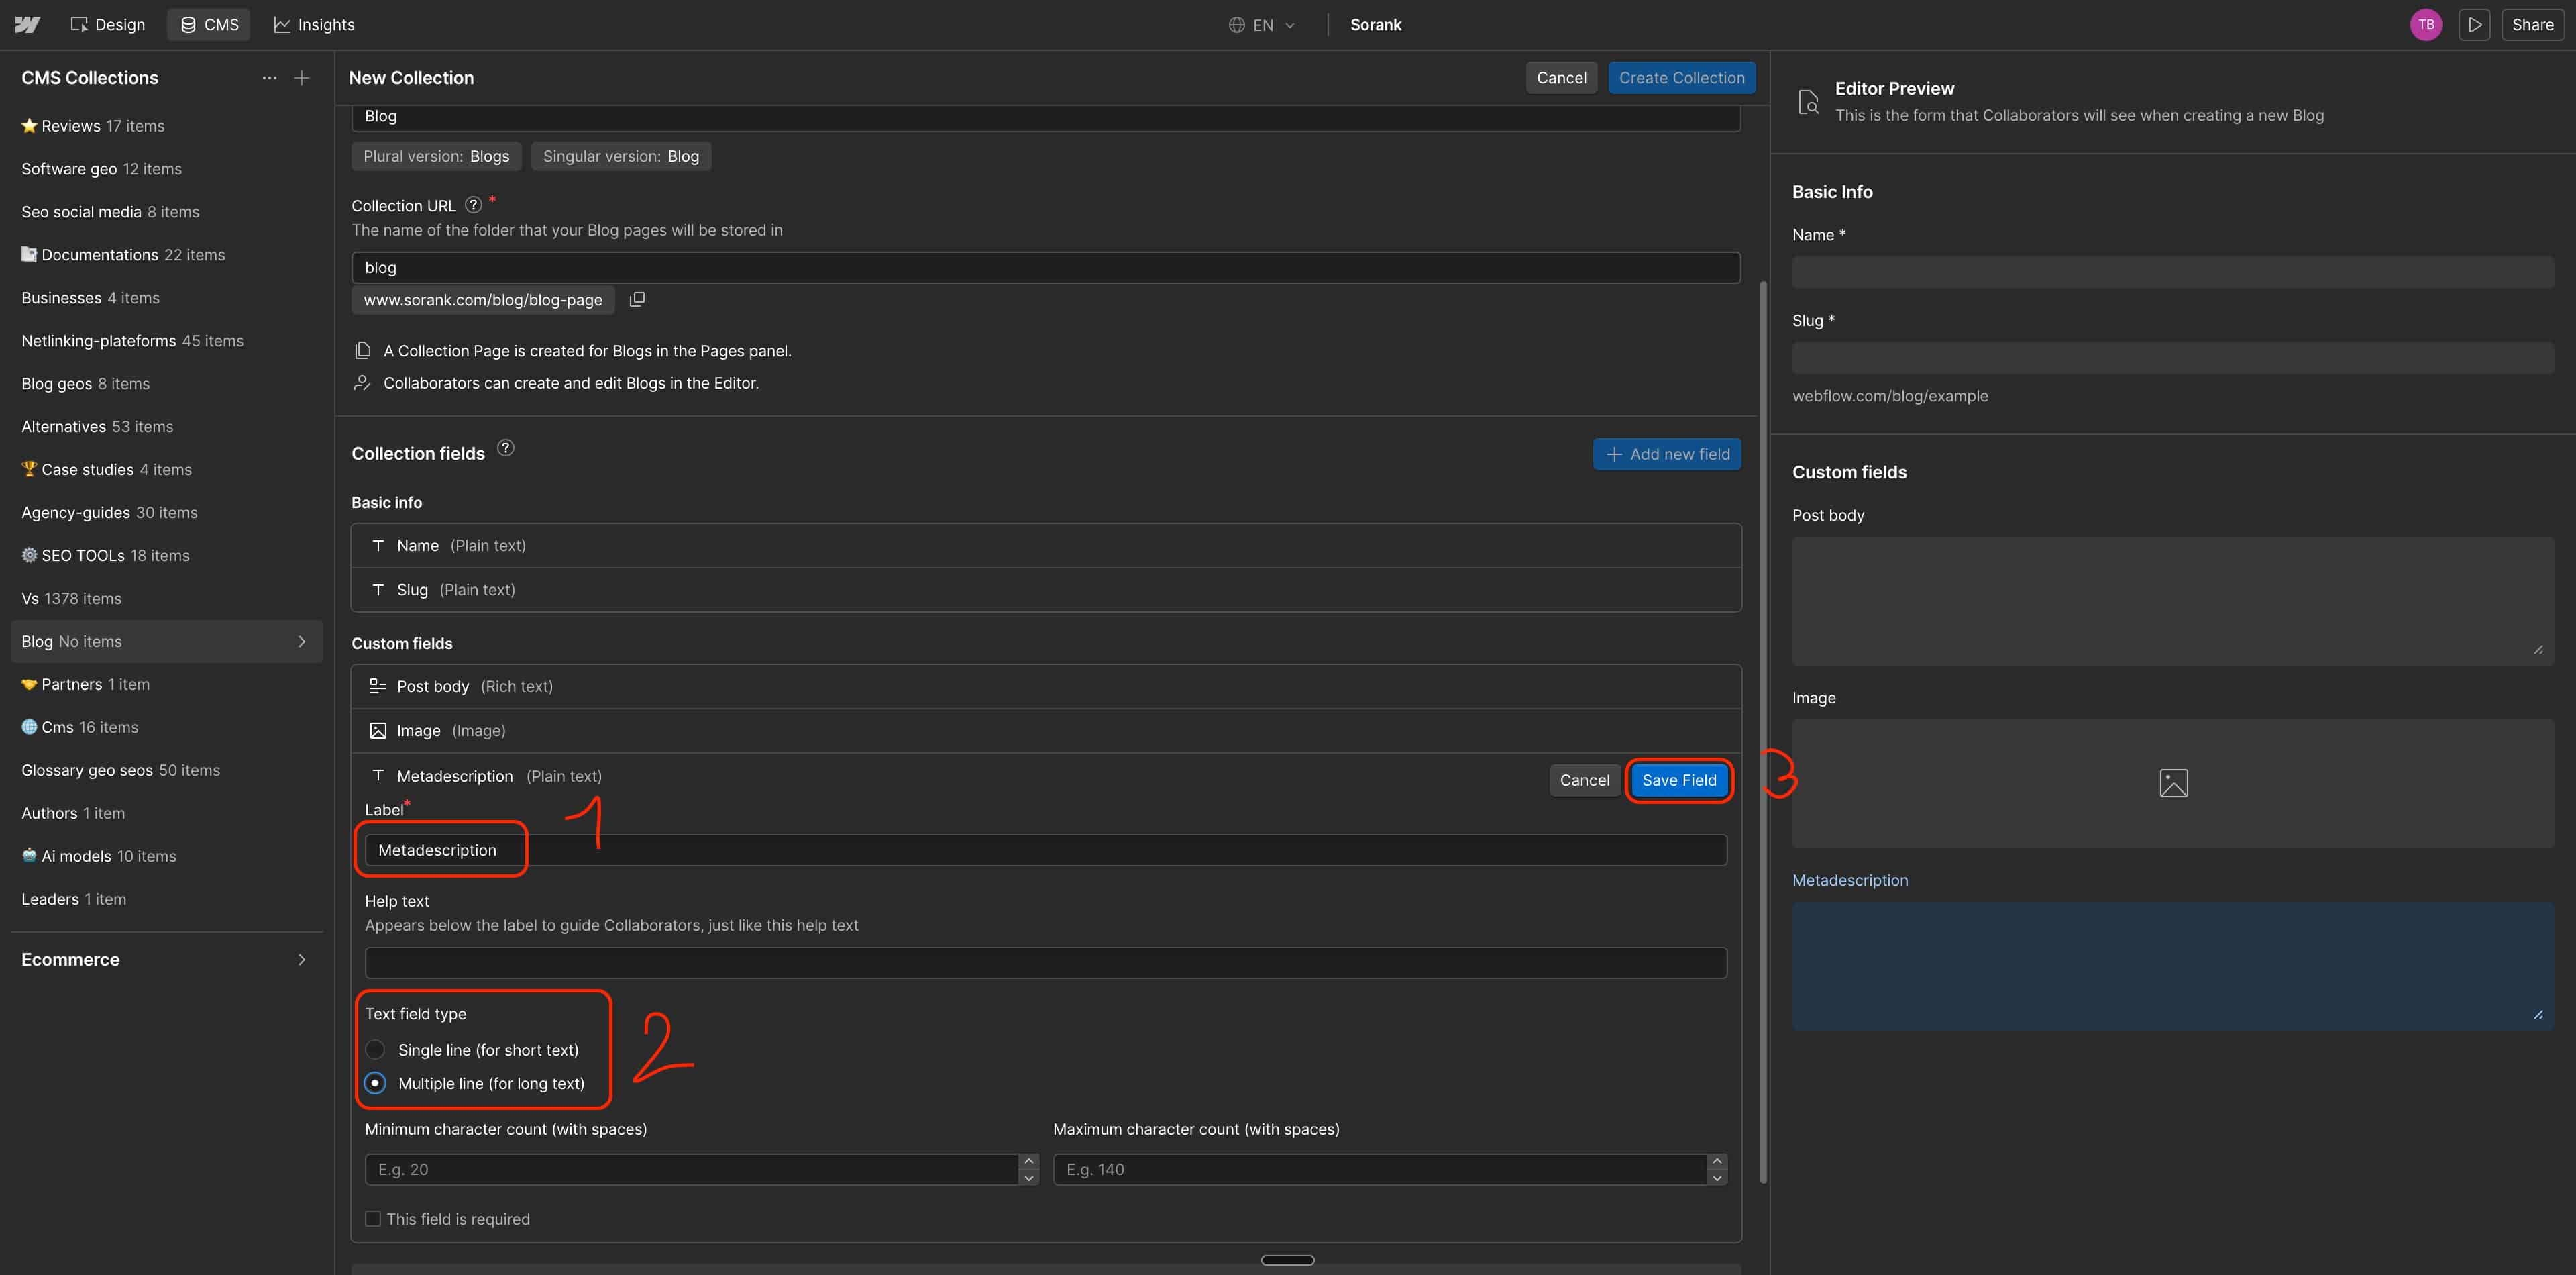
Haz clic en **+ Add field** y selecciona **Name**.
### Meta description
Haz clic en **+ Add field** y selecciona **META SEO**. Haz clic en **Save**.
### Title tag
Haz clic en **+ Add field** y selecciona **Name**.
### Meta description
Haz clic en **+ Add field** y selecciona **META SEO**. Haz clic en **Save**.
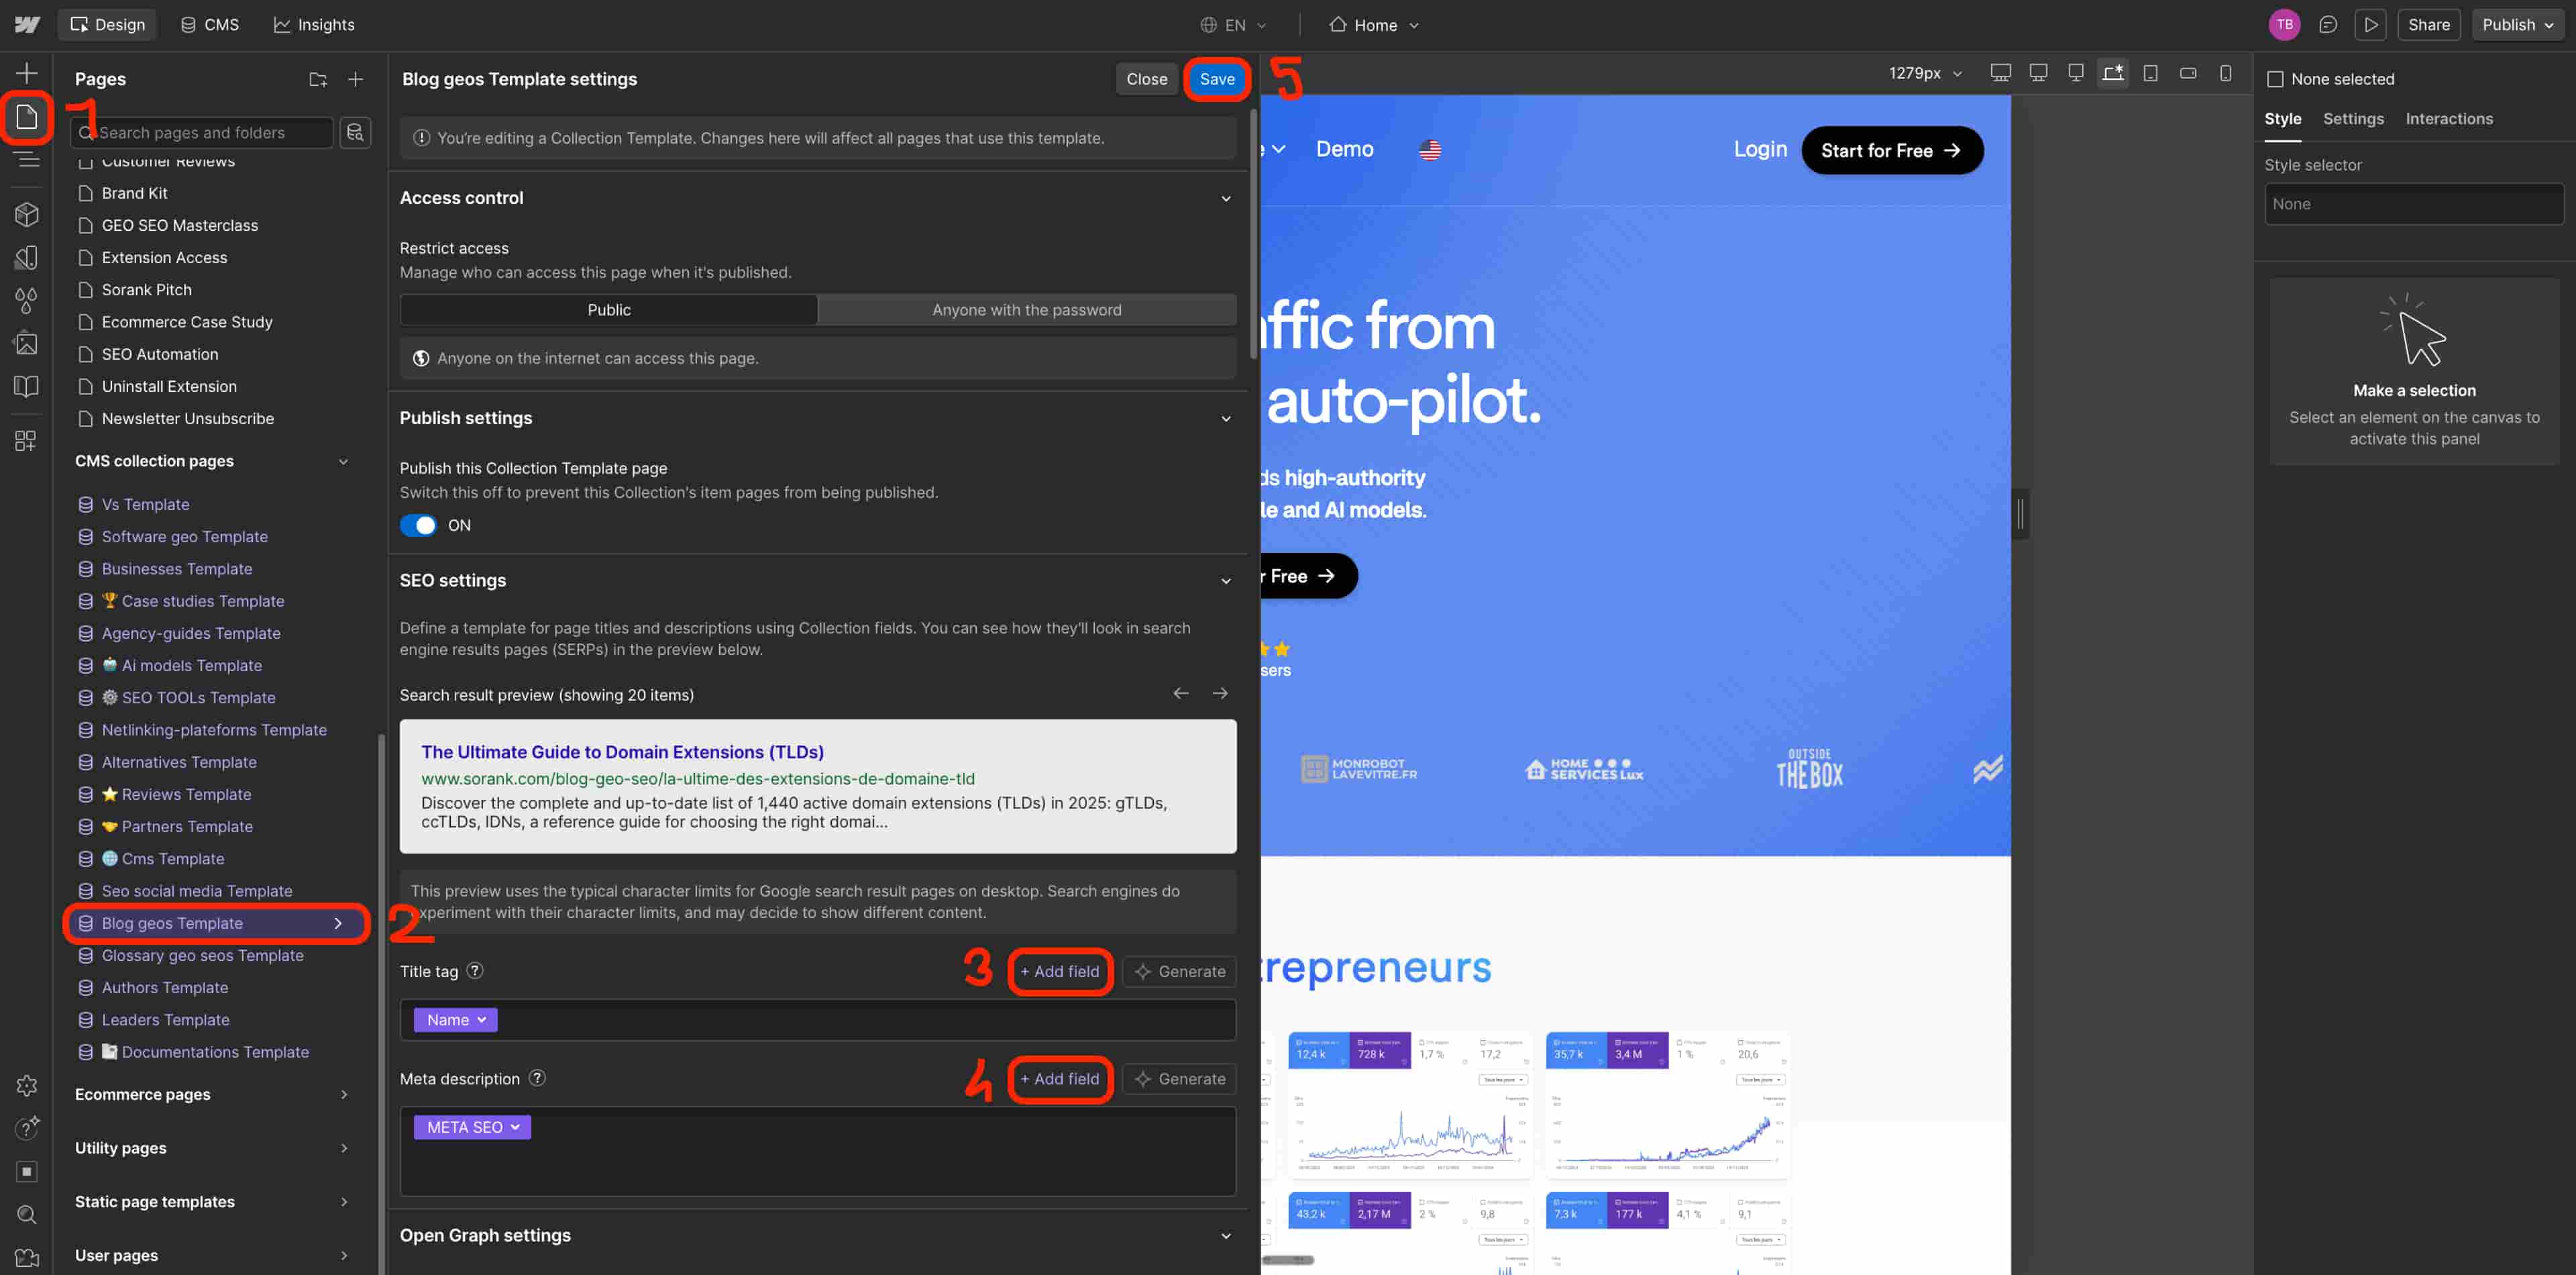 Esto garantiza que cada artículo que Sorank publica obtenga su propio título y meta descripción únicos en los resultados de búsqueda de Google.
## Paso 5: Publica tu sitio Webflow
Haz clic en **Publish** en la esquina superior derecha del Designer. Selecciona tu dominio en producción y confirma. Tu colección de blog ya está en línea y lista para recibir artículos de Sorank.
## Paso 6: Conecta Webflow a Sorank
Ve a tu cuenta de Sorank. Haz clic en **Publicar** en cualquier artículo, o ve a **Ajustes > Integración**. Haz clic en **Webflow** y luego en **Conectar tu CMS**. Autoriza a Sorank a acceder a tu cuenta de Webflow. Selecciona tu colección **Blog**. Asigna cada campo de Sorank al campo correspondiente de Webflow. Haz clic en **Confirm setup**.
Cada artículo que generes en Sorank ahora se puede publicar directamente en tu blog de Webflow con un solo clic, con imágenes, metaetiquetas y slug incluidos.
Esto garantiza que cada artículo que Sorank publica obtenga su propio título y meta descripción únicos en los resultados de búsqueda de Google.
## Paso 5: Publica tu sitio Webflow
Haz clic en **Publish** en la esquina superior derecha del Designer. Selecciona tu dominio en producción y confirma. Tu colección de blog ya está en línea y lista para recibir artículos de Sorank.
## Paso 6: Conecta Webflow a Sorank
Ve a tu cuenta de Sorank. Haz clic en **Publicar** en cualquier artículo, o ve a **Ajustes > Integración**. Haz clic en **Webflow** y luego en **Conectar tu CMS**. Autoriza a Sorank a acceder a tu cuenta de Webflow. Selecciona tu colección **Blog**. Asigna cada campo de Sorank al campo correspondiente de Webflow. Haz clic en **Confirm setup**.
Cada artículo que generes en Sorank ahora se puede publicar directamente en tu blog de Webflow con un solo clic, con imágenes, metaetiquetas y slug incluidos.