> ## Documentation Index
> Fetch the complete documentation index at: https://sorank.com/llms.txt
> Use this file to discover all available pages before exploring further.
# Setup your Webflow blog
> Doc Sorank - Setup your Webflow blog
Follow these steps to create a blog collection on your Webflow site and connect it to Sorank so articles are published directly to your CMS.
## Step 1: Open the CMS Panel
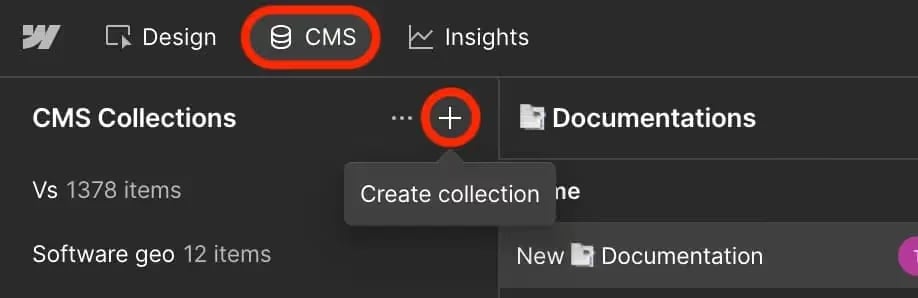
Open your Webflow Designer. Click **CMS** in the top navigation bar. Click the **+** button next to "CMS Collections". Select **Create collection**.
 ## Step 2: Create a Blog Collection
In the "New Collection" dialog, click the **Blog Posts** template. Set the Collection Name to **Blog**. The URL becomes **/blog** automatically. Click **Create Collection**.
## Step 2: Create a Blog Collection
In the "New Collection" dialog, click the **Blog Posts** template. Set the Collection Name to **Blog**. The URL becomes **/blog** automatically. Click **Create Collection**.
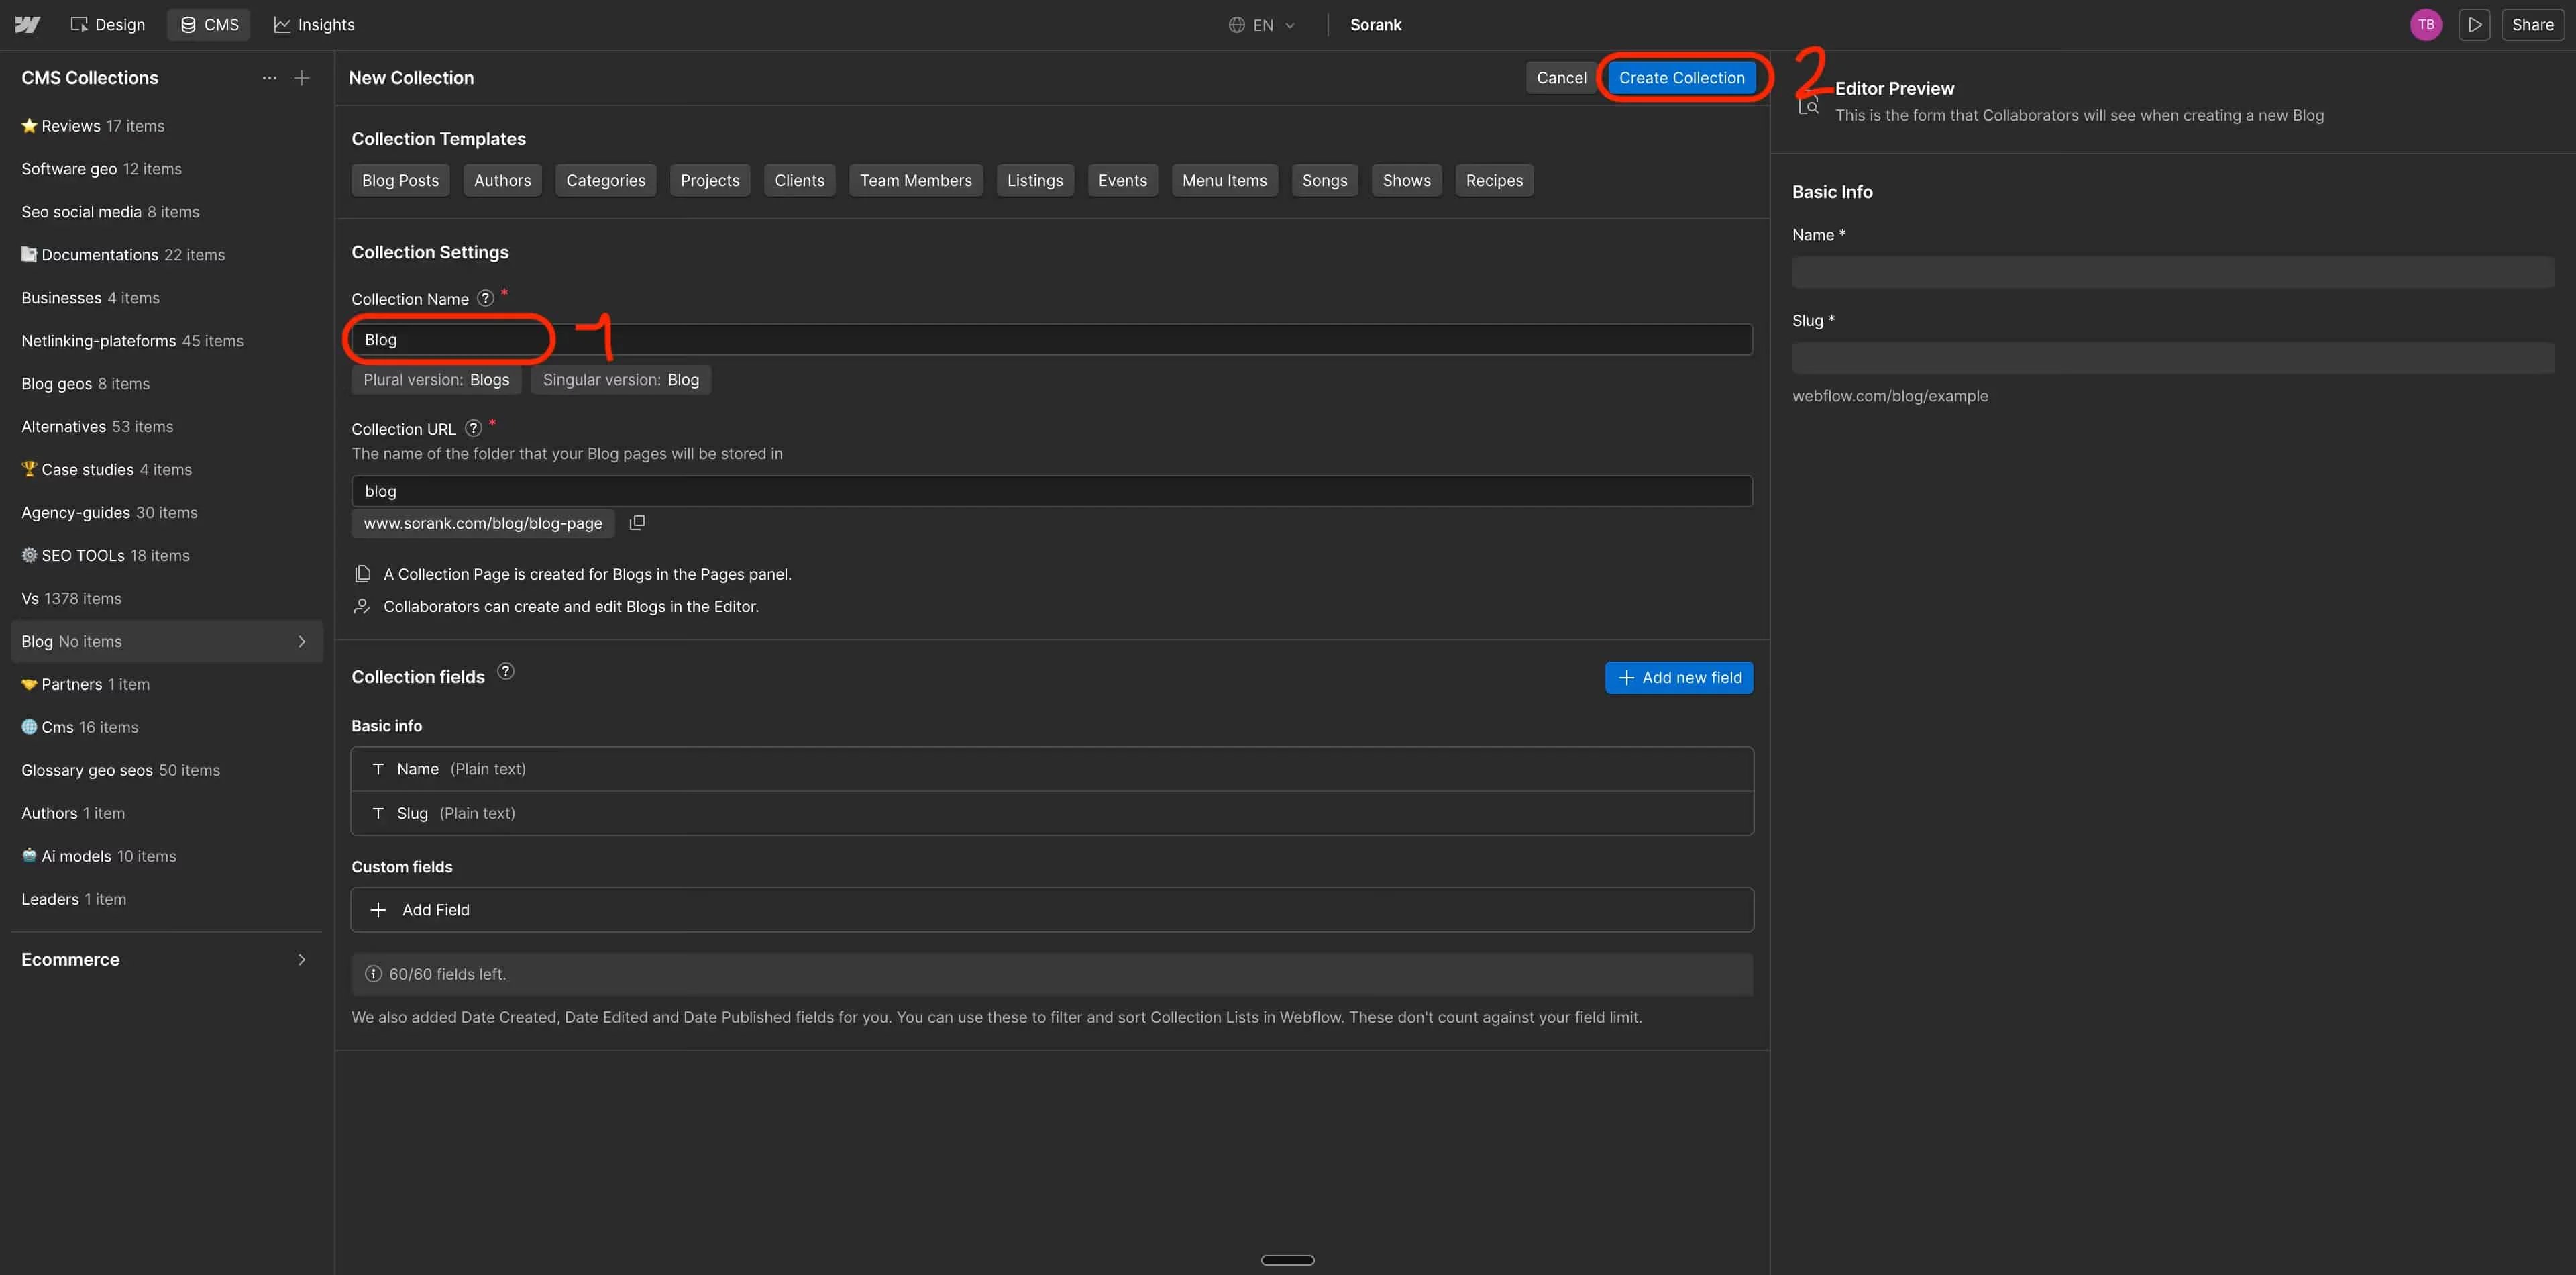 ⚠️ The collection name must be exactly **Blog**. Sorank uses this name to identify your collection.
## Step 3: Add the Required Custom Fields
Click **+ Add new field**. You need to create 3 custom fields one by one.
### Field 1: Post body
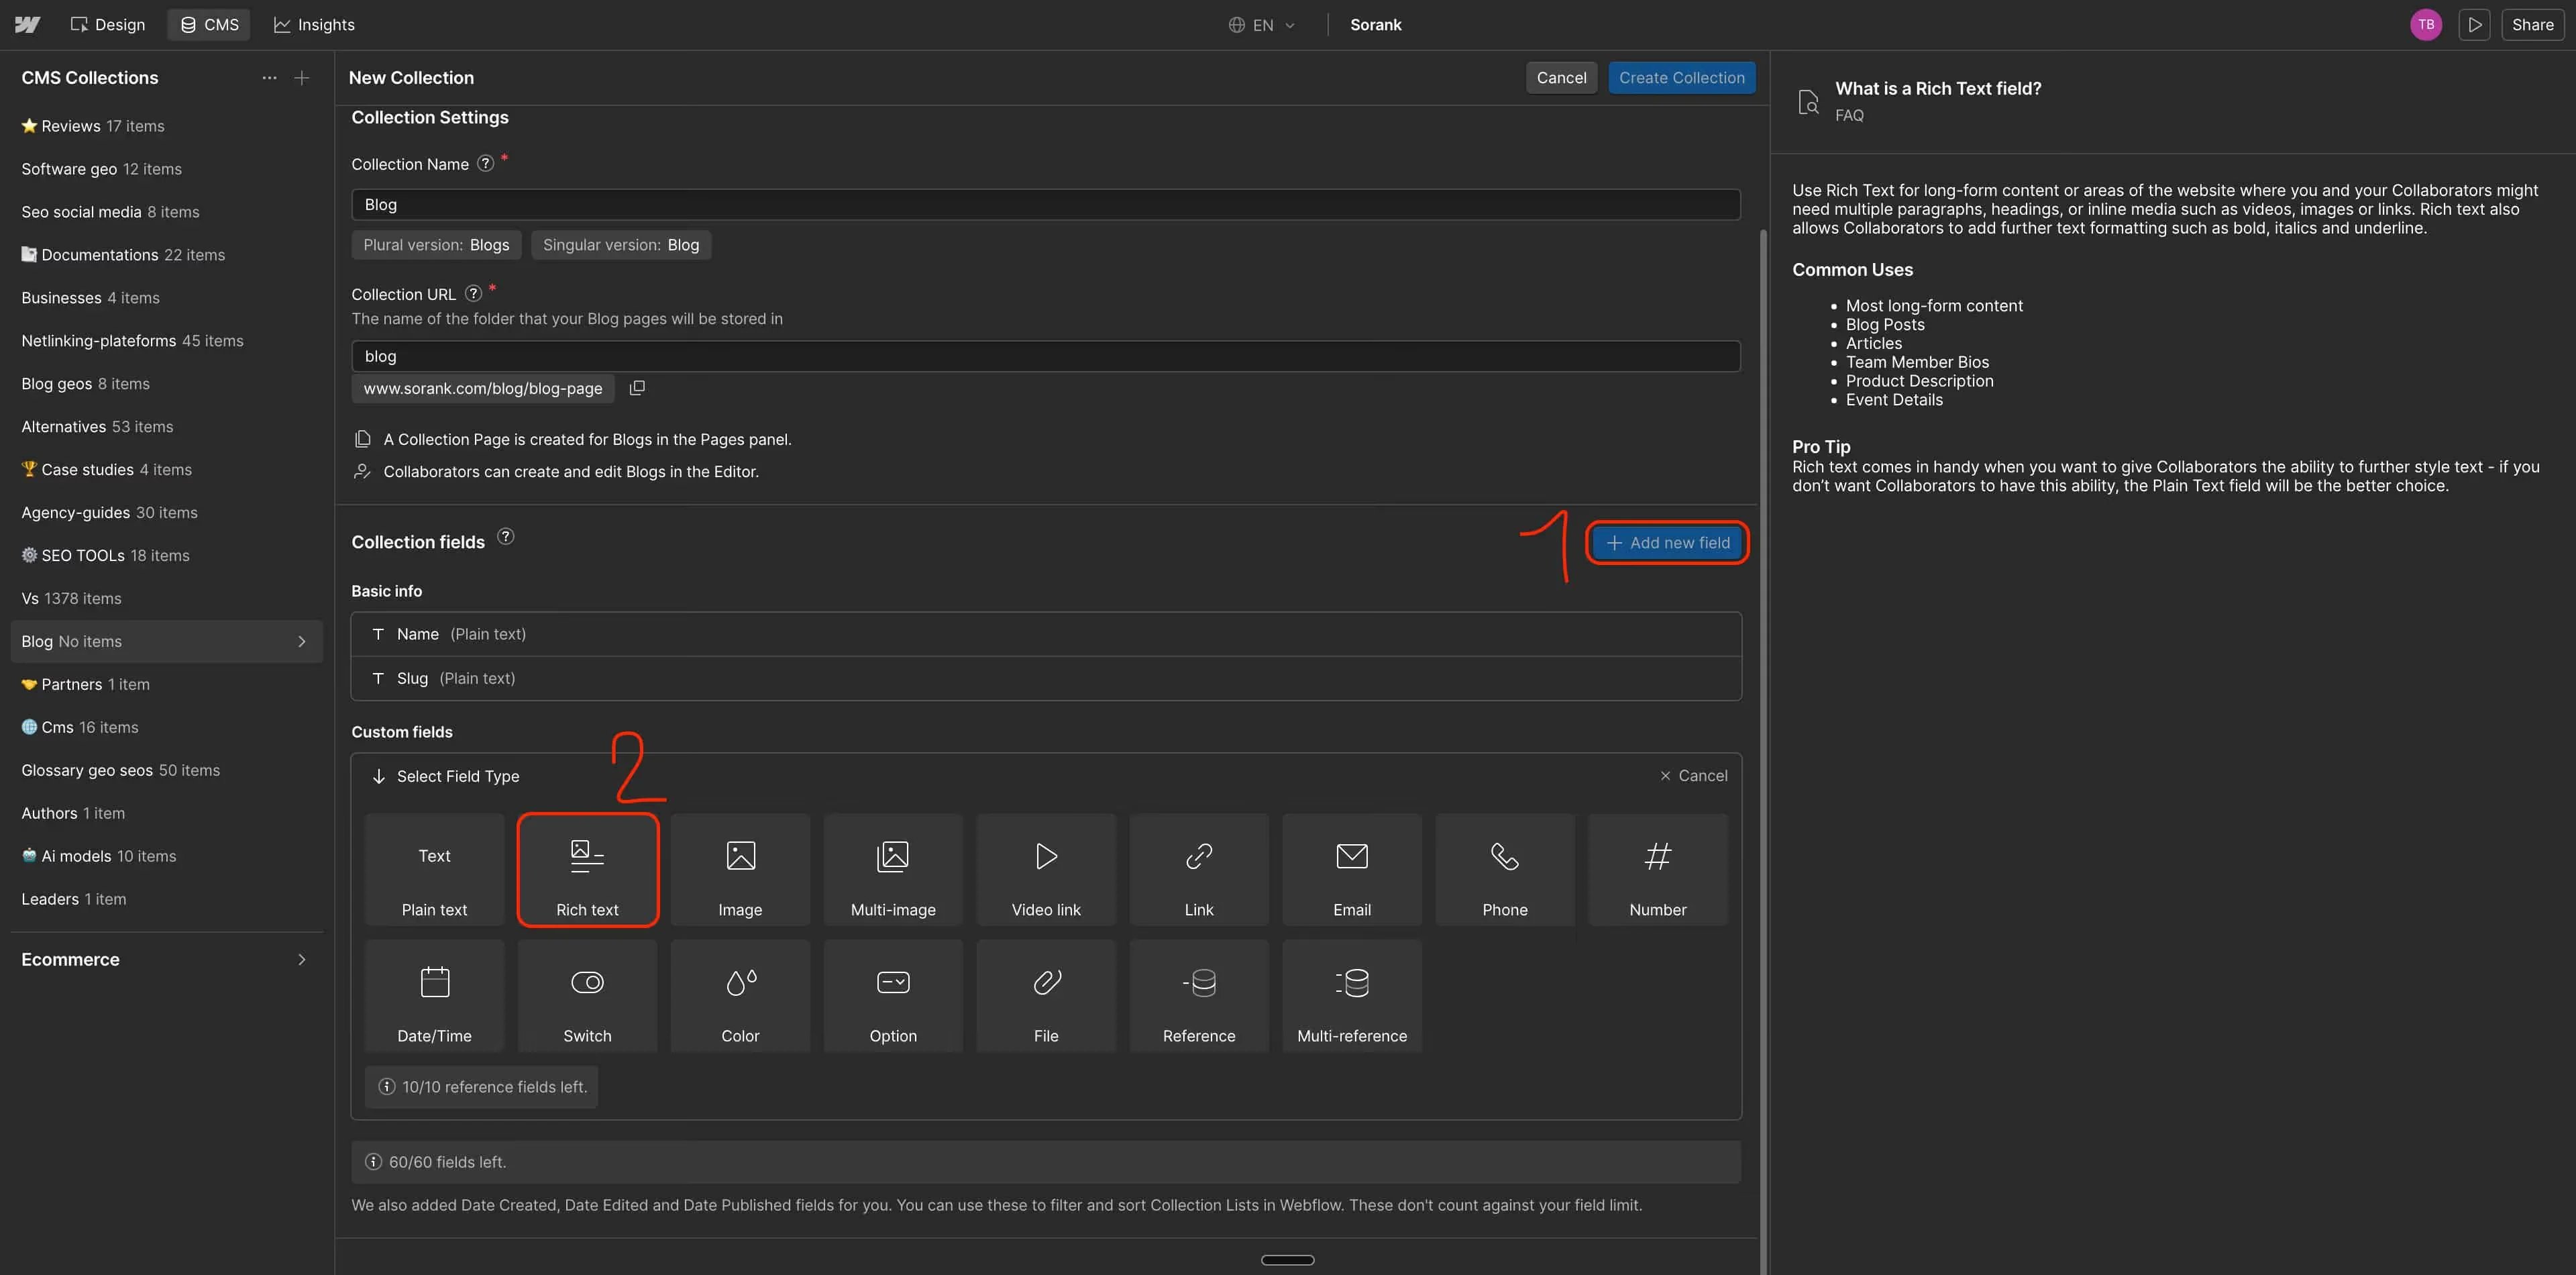
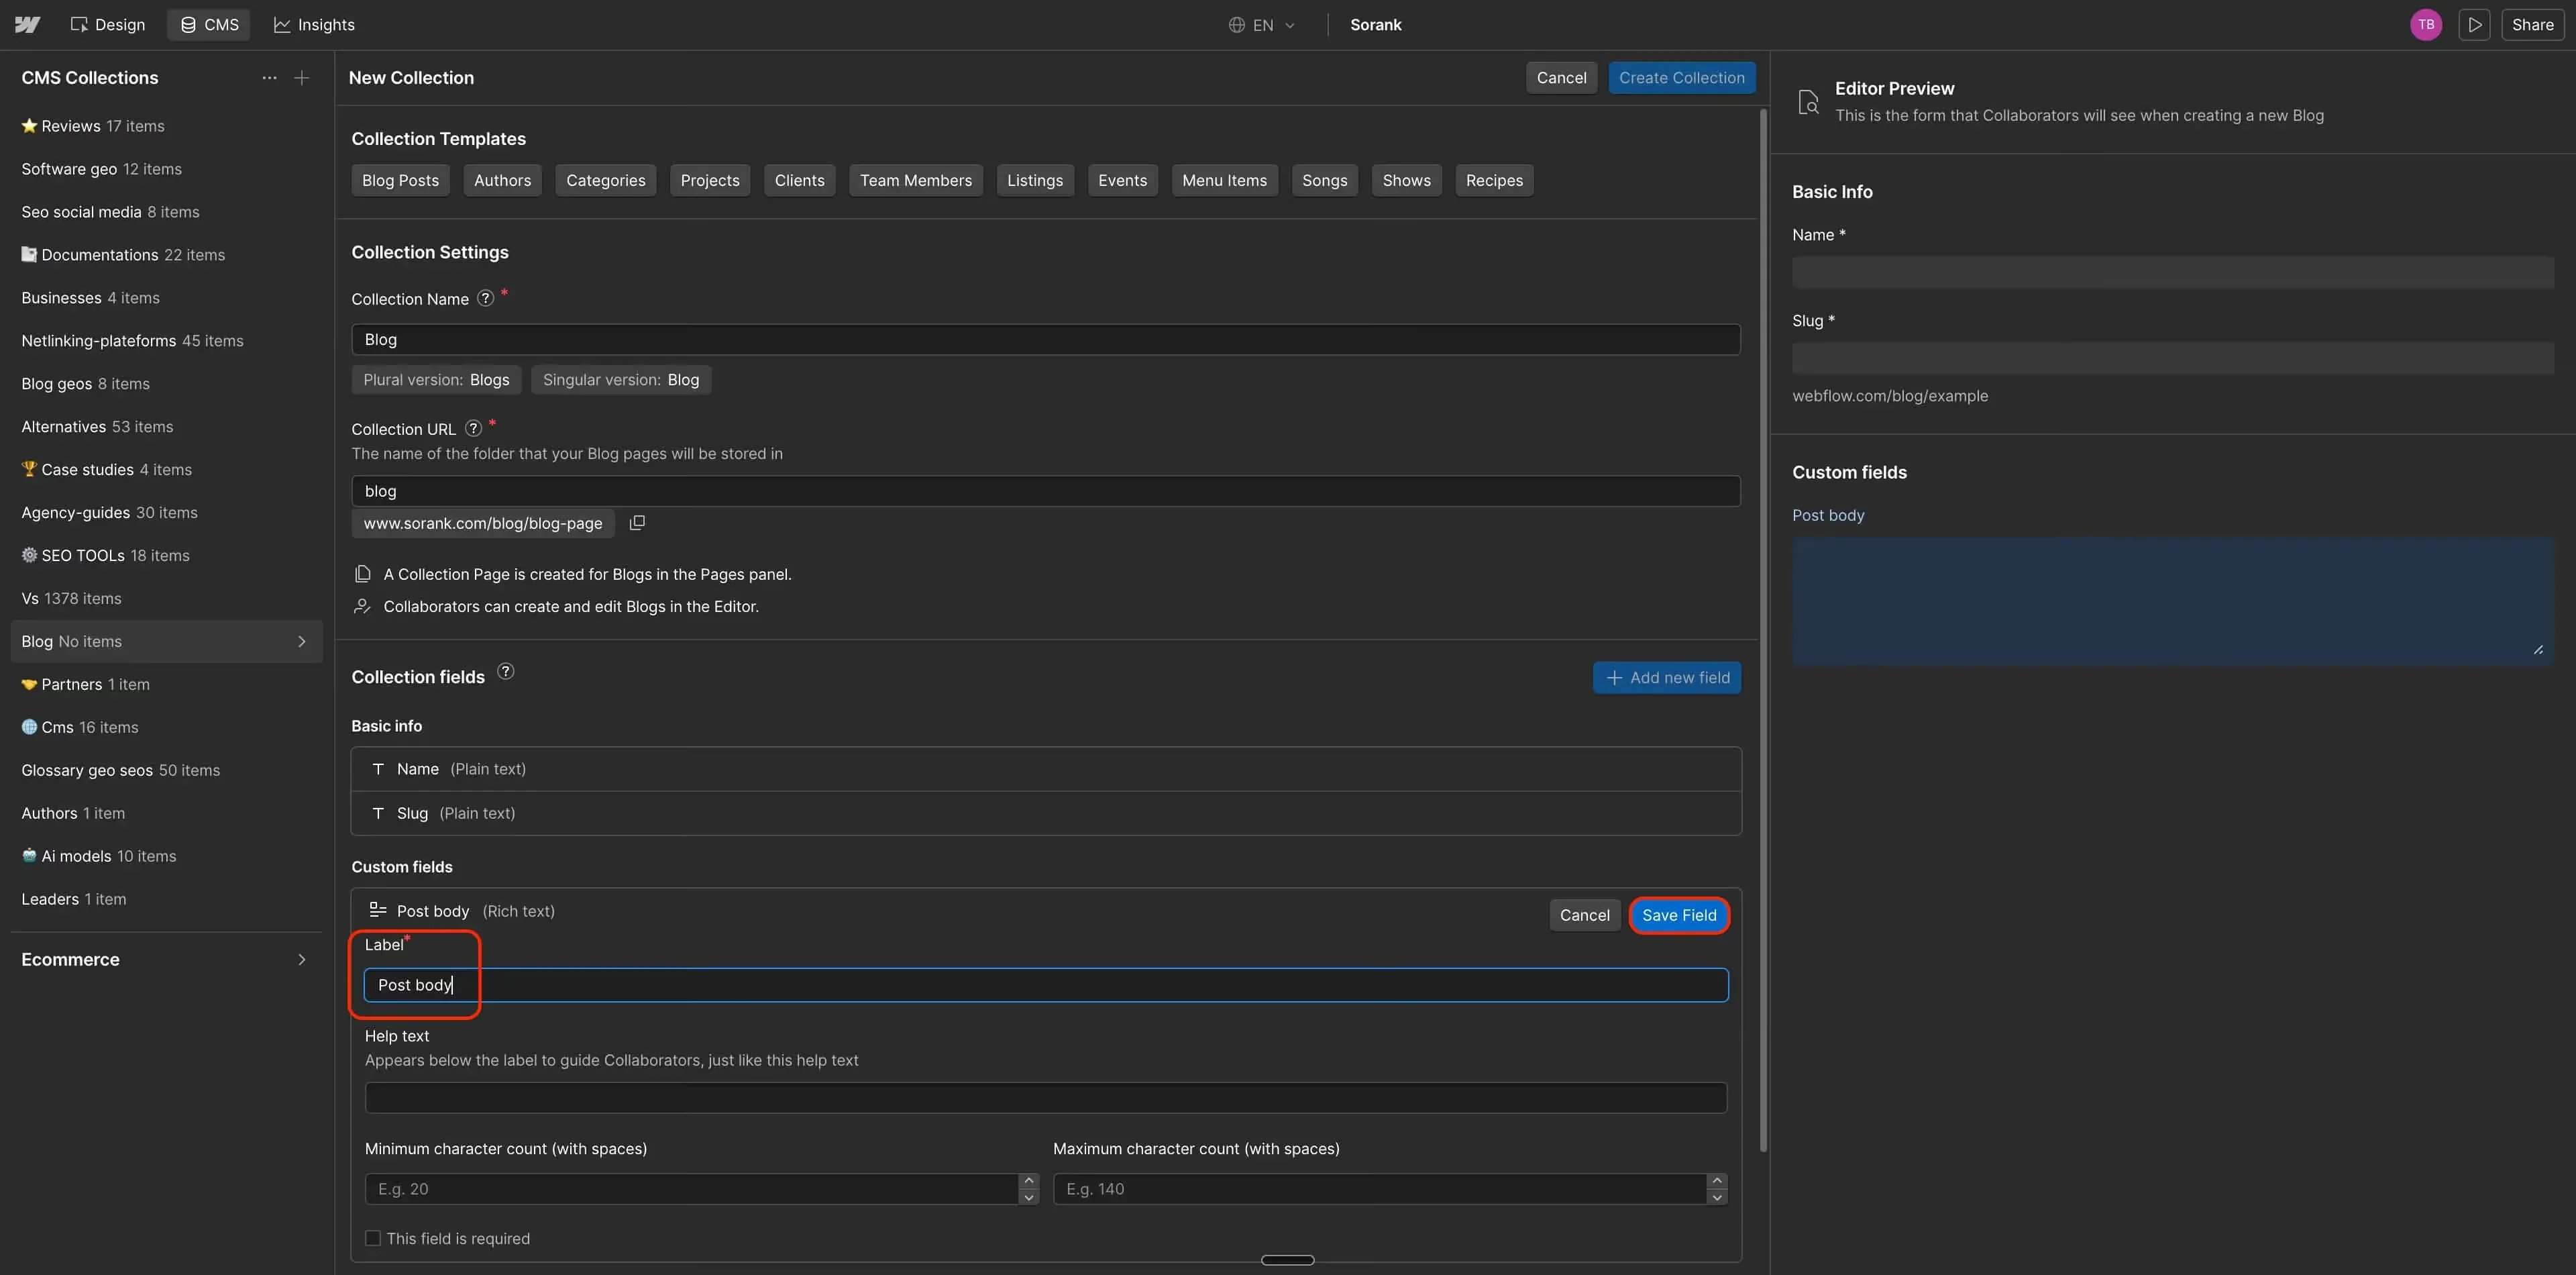
Click **+ Add new field**. Select **Rich text**. Name it **Post body**. Click **Save Field**.
⚠️ The collection name must be exactly **Blog**. Sorank uses this name to identify your collection.
## Step 3: Add the Required Custom Fields
Click **+ Add new field**. You need to create 3 custom fields one by one.
### Field 1: Post body
Click **+ Add new field**. Select **Rich text**. Name it **Post body**. Click **Save Field**.
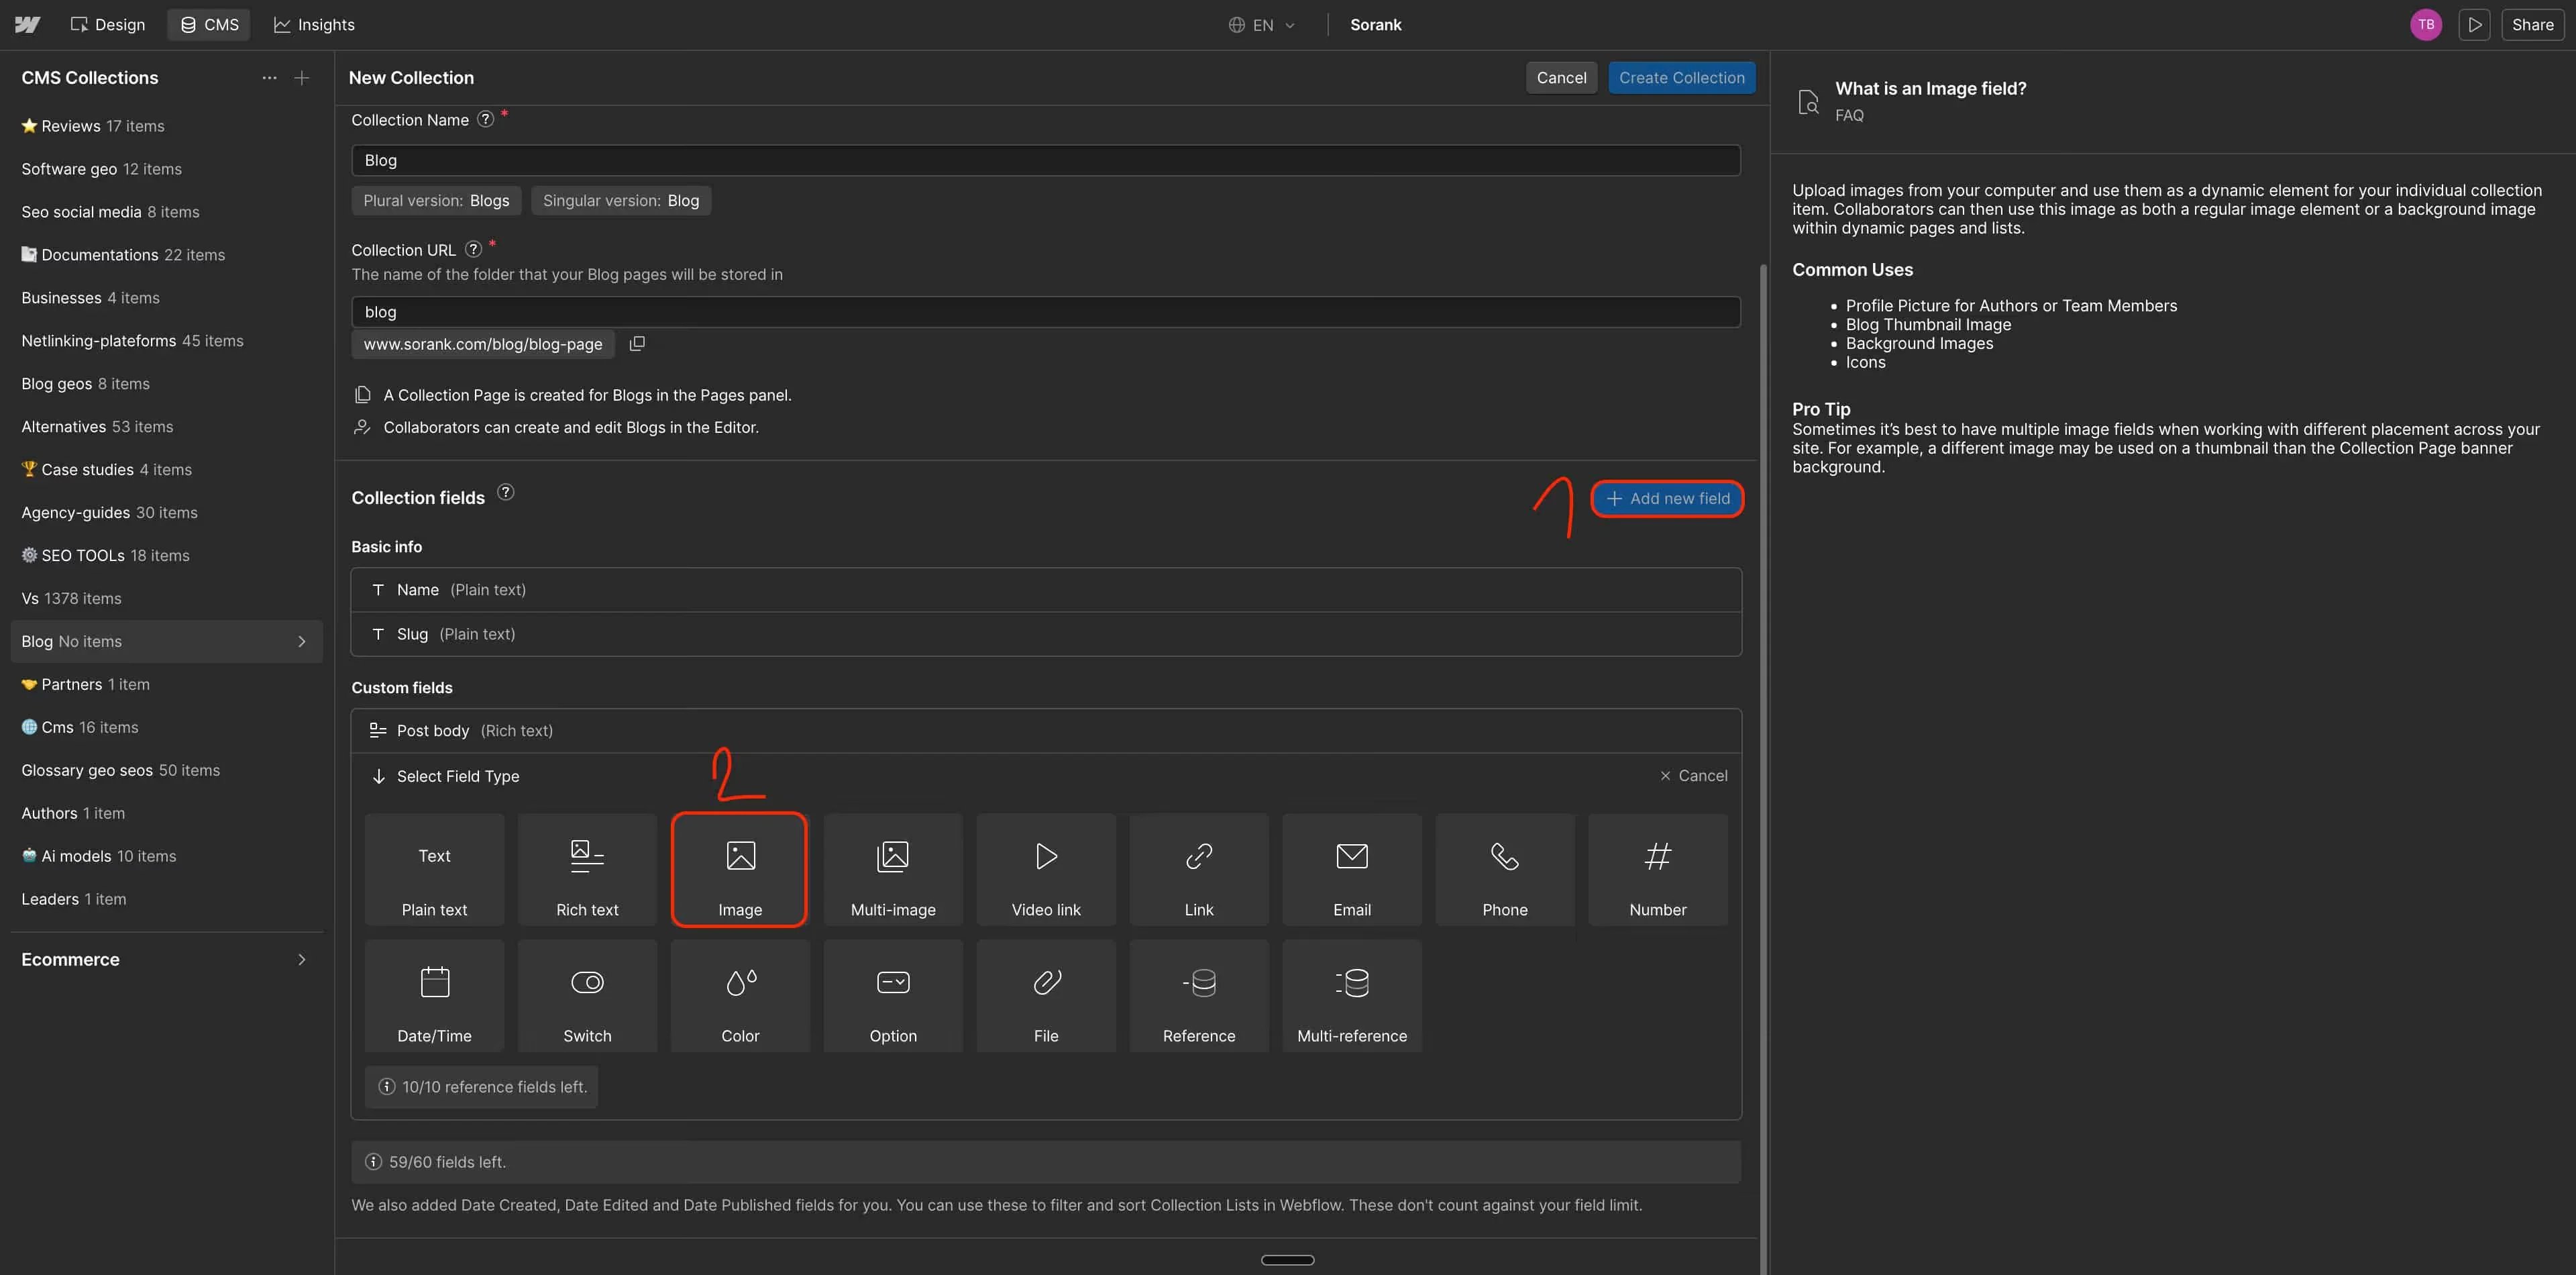
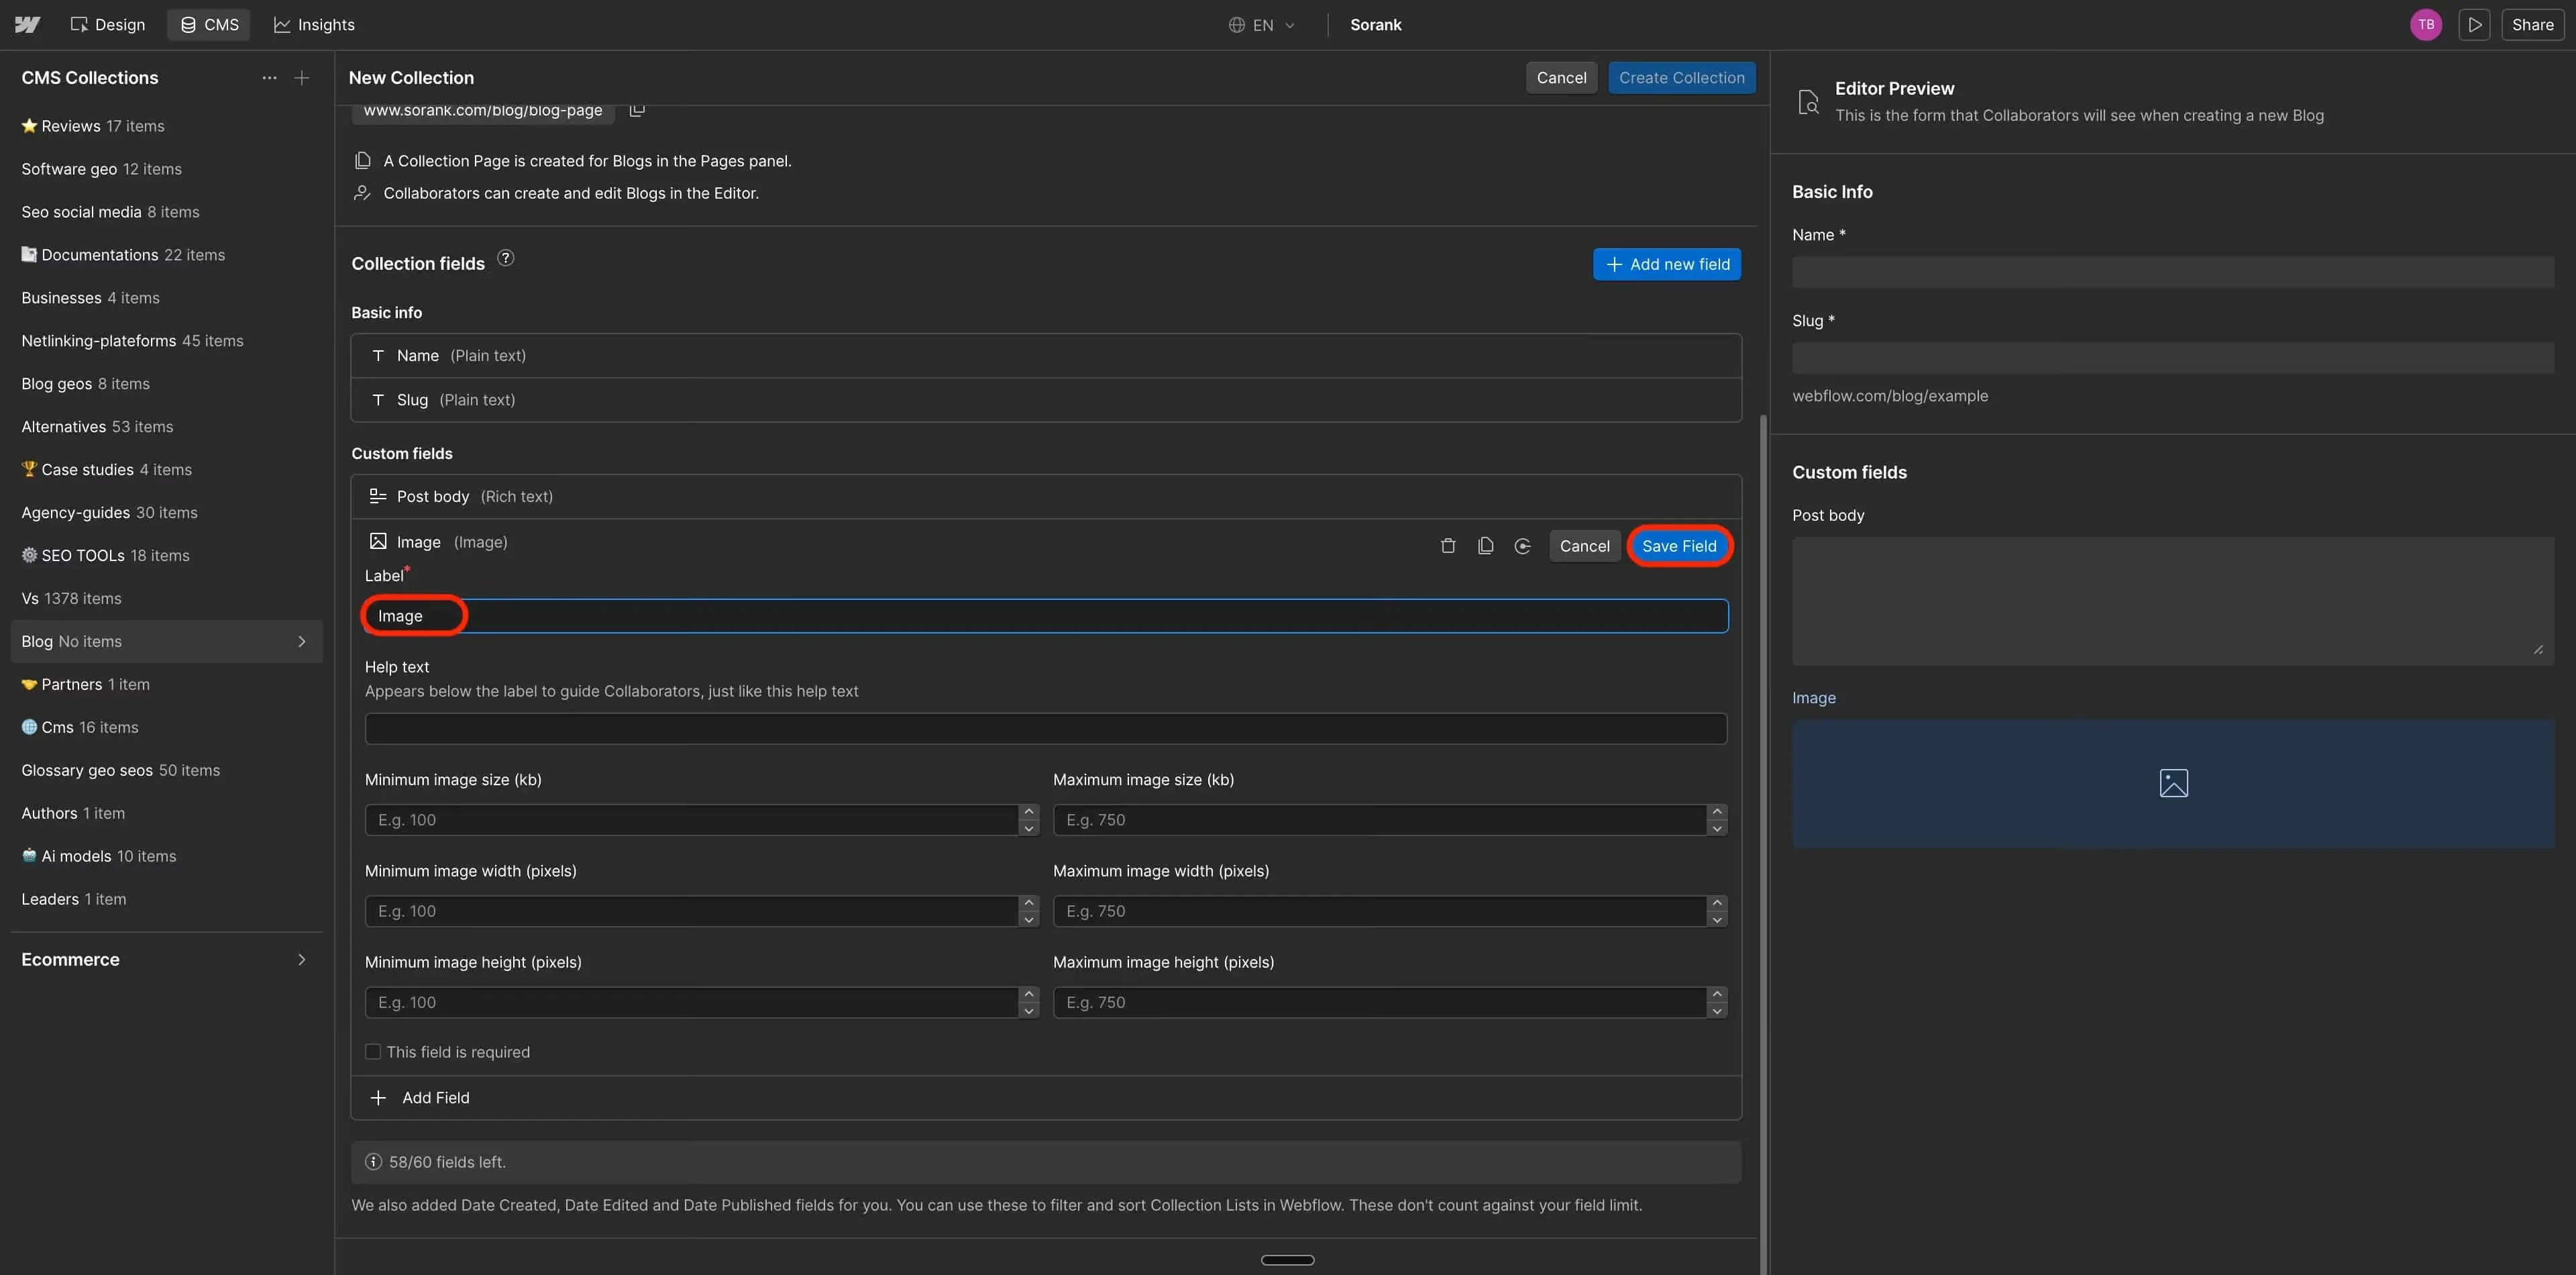
 ### Field 2: Image
Click **+ Add new field** again. Select **Image**. Name it **Image**. Click **Save Field**.
### Field 2: Image
Click **+ Add new field** again. Select **Image**. Name it **Image**. Click **Save Field**.
 ### Field 3: Metadescription
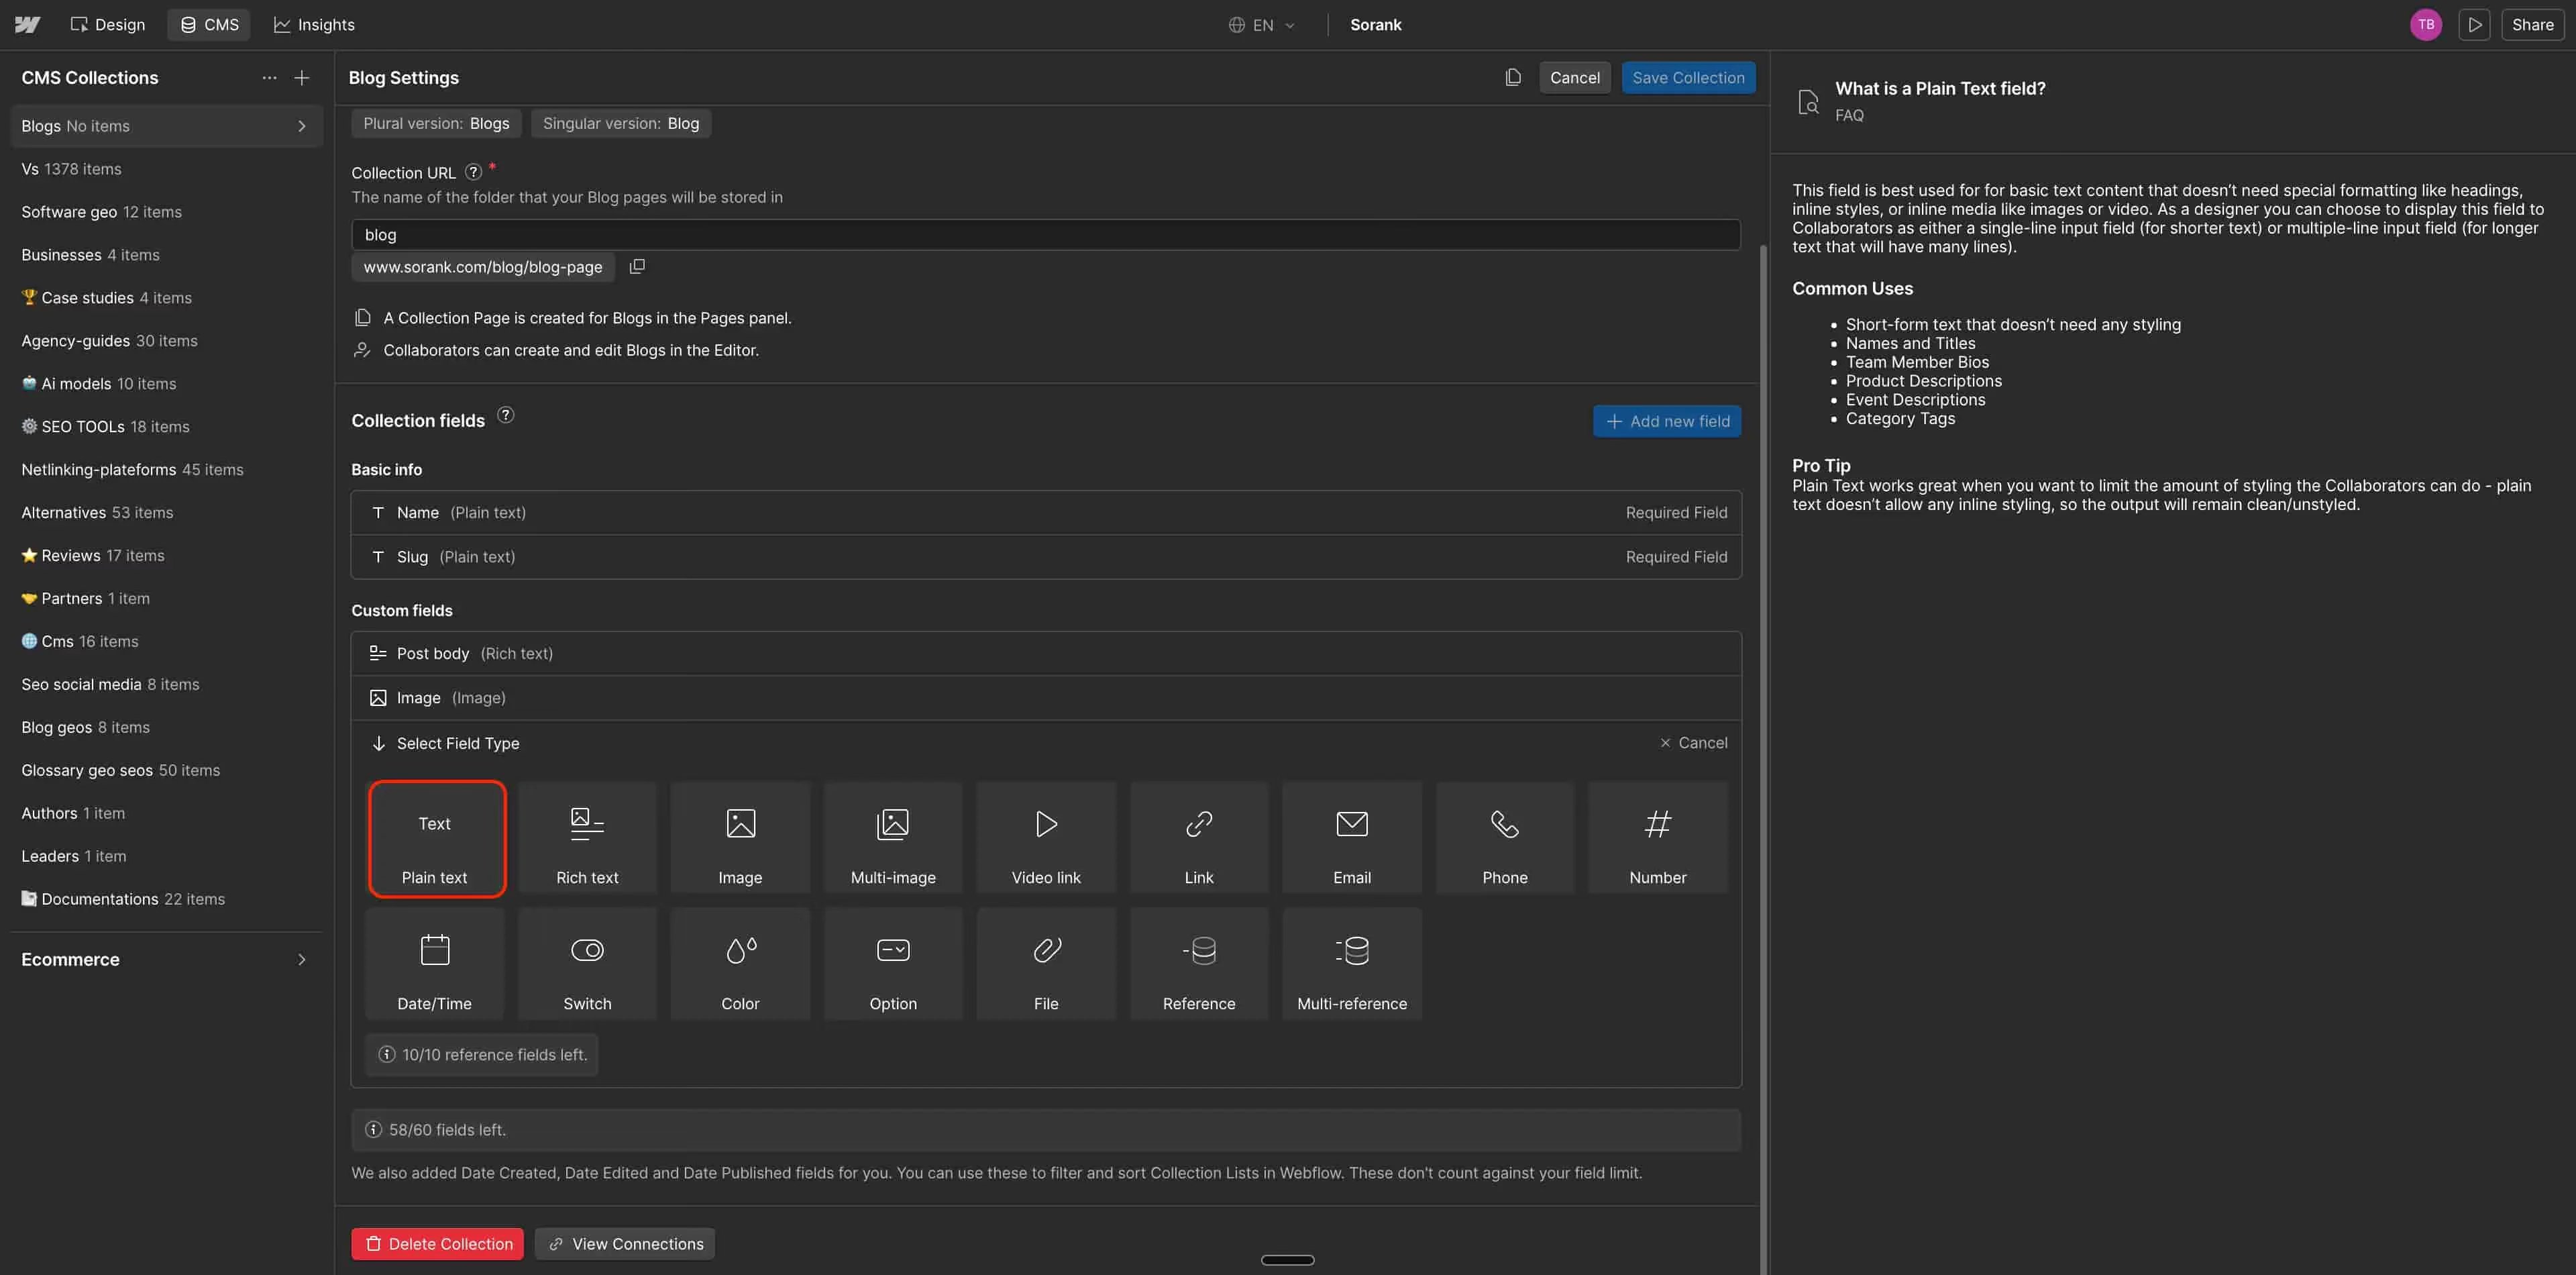
Click **+ Add new field** again. Select **Plain text**. Name it **Metadescription**. Set the text field type to **Multiple line**. Click **Save Field**.
### Field 3: Metadescription
Click **+ Add new field** again. Select **Plain text**. Name it **Metadescription**. Set the text field type to **Multiple line**. Click **Save Field**.
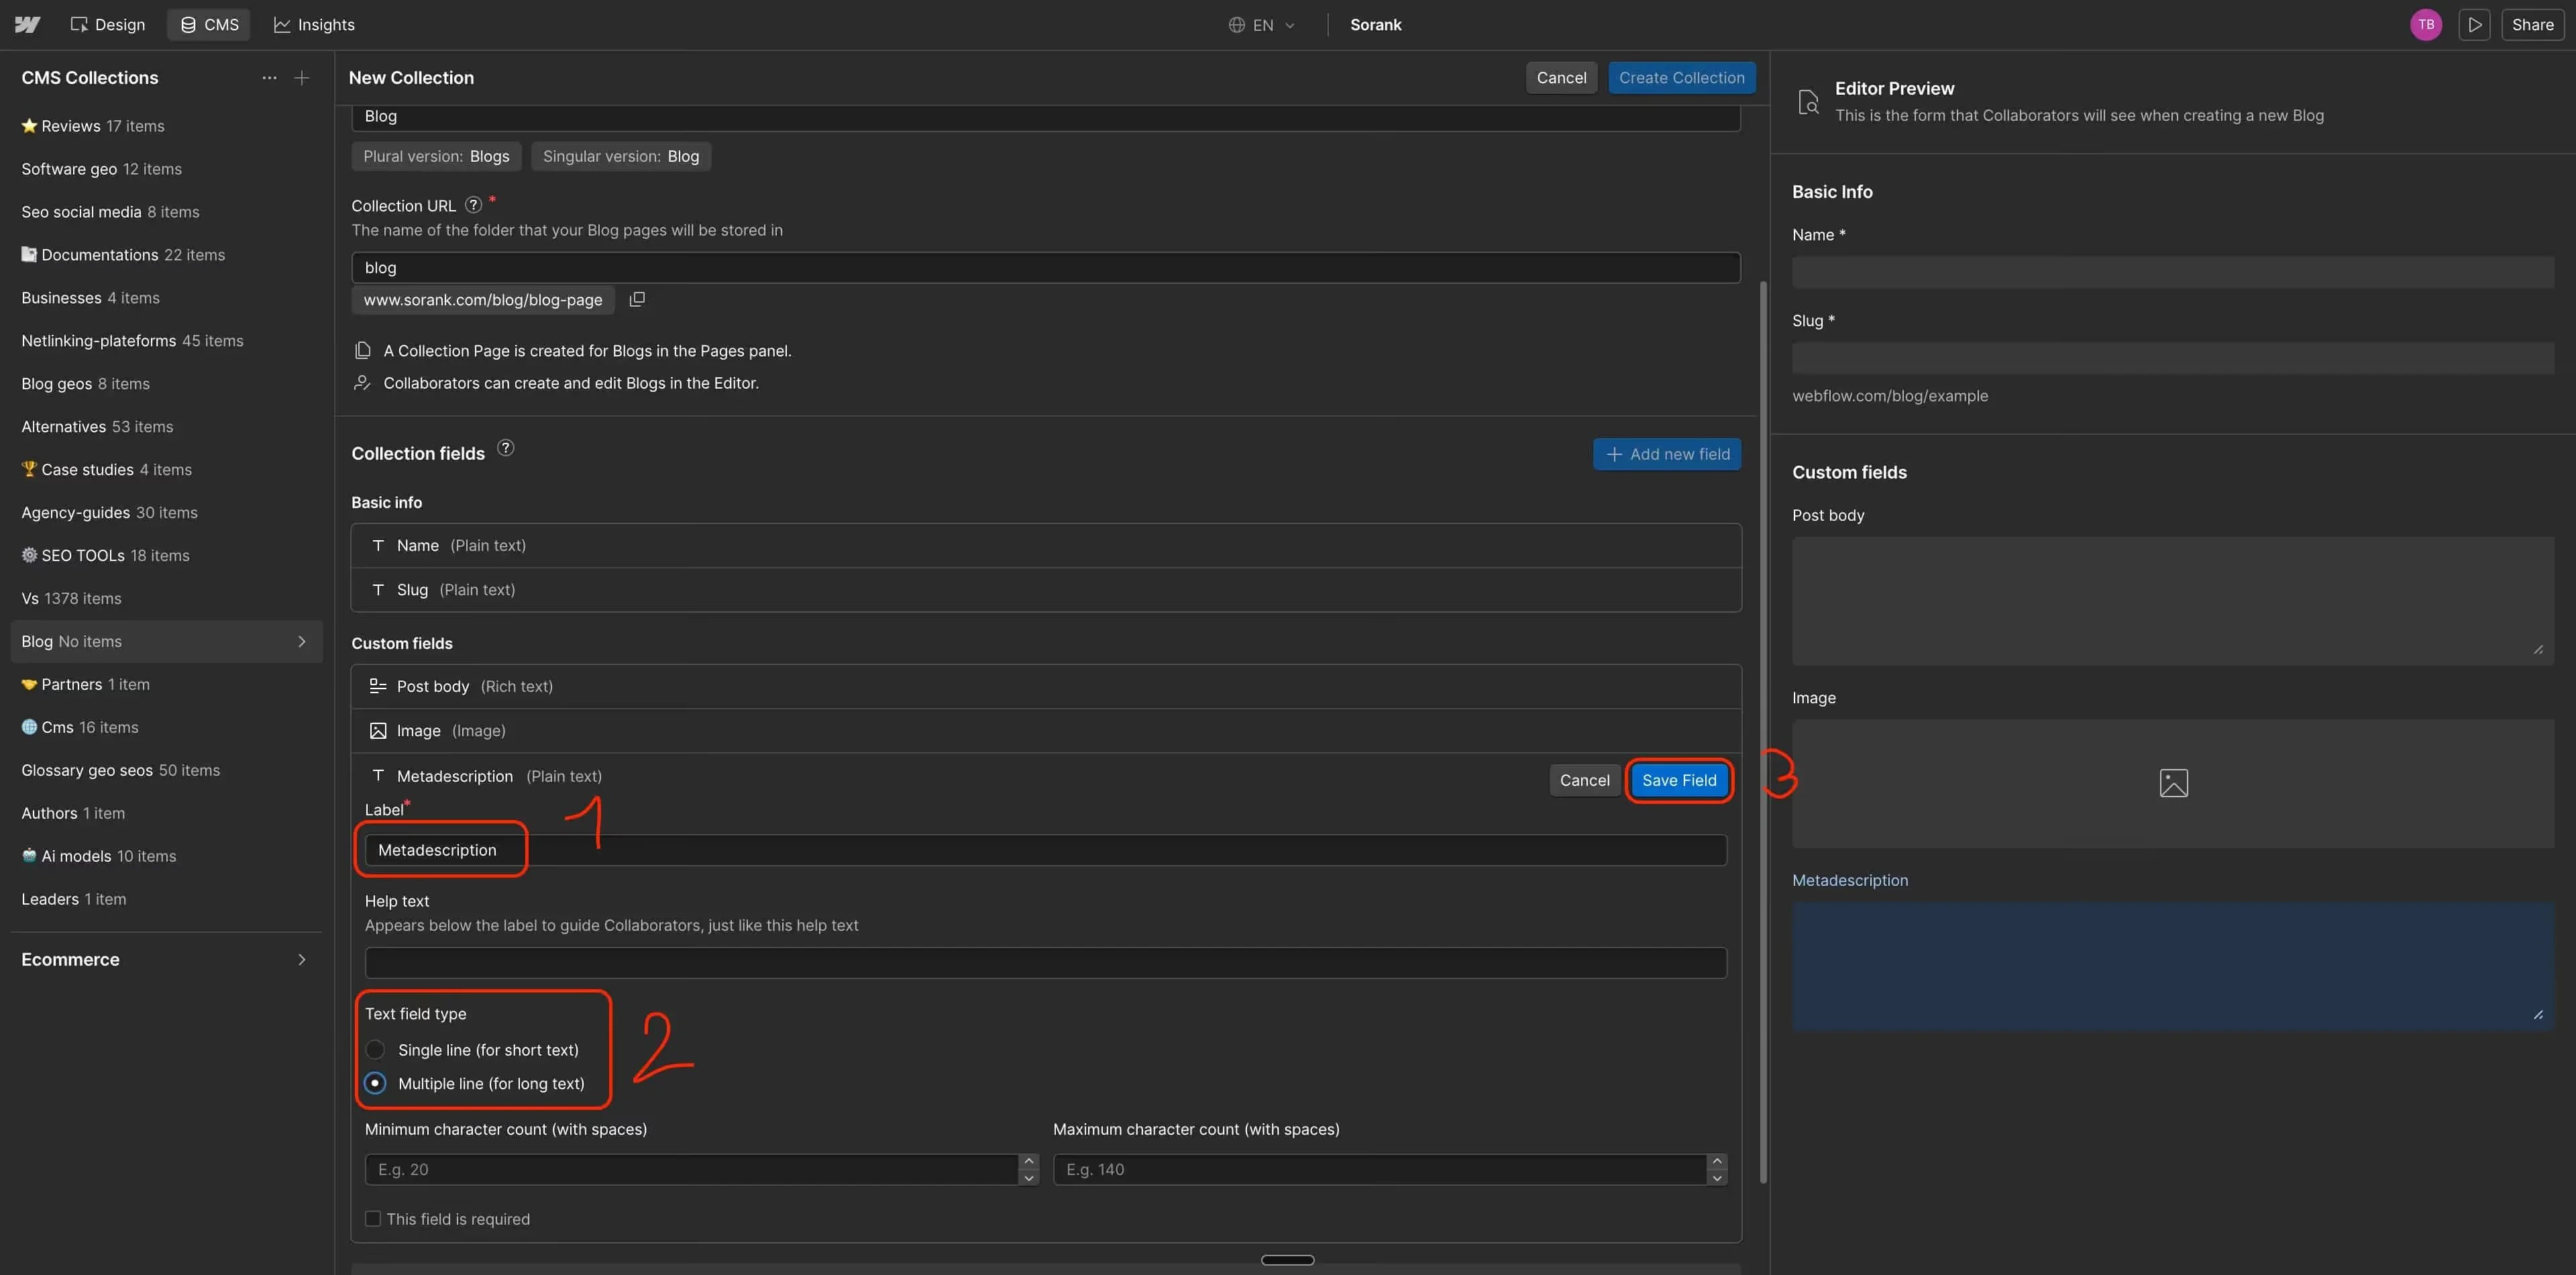
 Click **Save Collection**. The fields **Name** and **Slug** are created by default. Do not delete them.
## Step 4: Configure SEO Settings on the Blog Template Page
Click the **Pages** icon in the top-left of the Designer. Under "CMS collection pages", click **Blog geos Template**. In the right panel, go to **Settings**. Scroll down to **SEO settings**.
Click **Save Collection**. The fields **Name** and **Slug** are created by default. Do not delete them.
## Step 4: Configure SEO Settings on the Blog Template Page
Click the **Pages** icon in the top-left of the Designer. Under "CMS collection pages", click **Blog geos Template**. In the right panel, go to **Settings**. Scroll down to **SEO settings**.
 ### Title tag
Click **+ Add field** and select **Name**.
### Meta description
Click **+ Add field** and select **META SEO**. Click **Save**.
### Title tag
Click **+ Add field** and select **Name**.
### Meta description
Click **+ Add field** and select **META SEO**. Click **Save**.
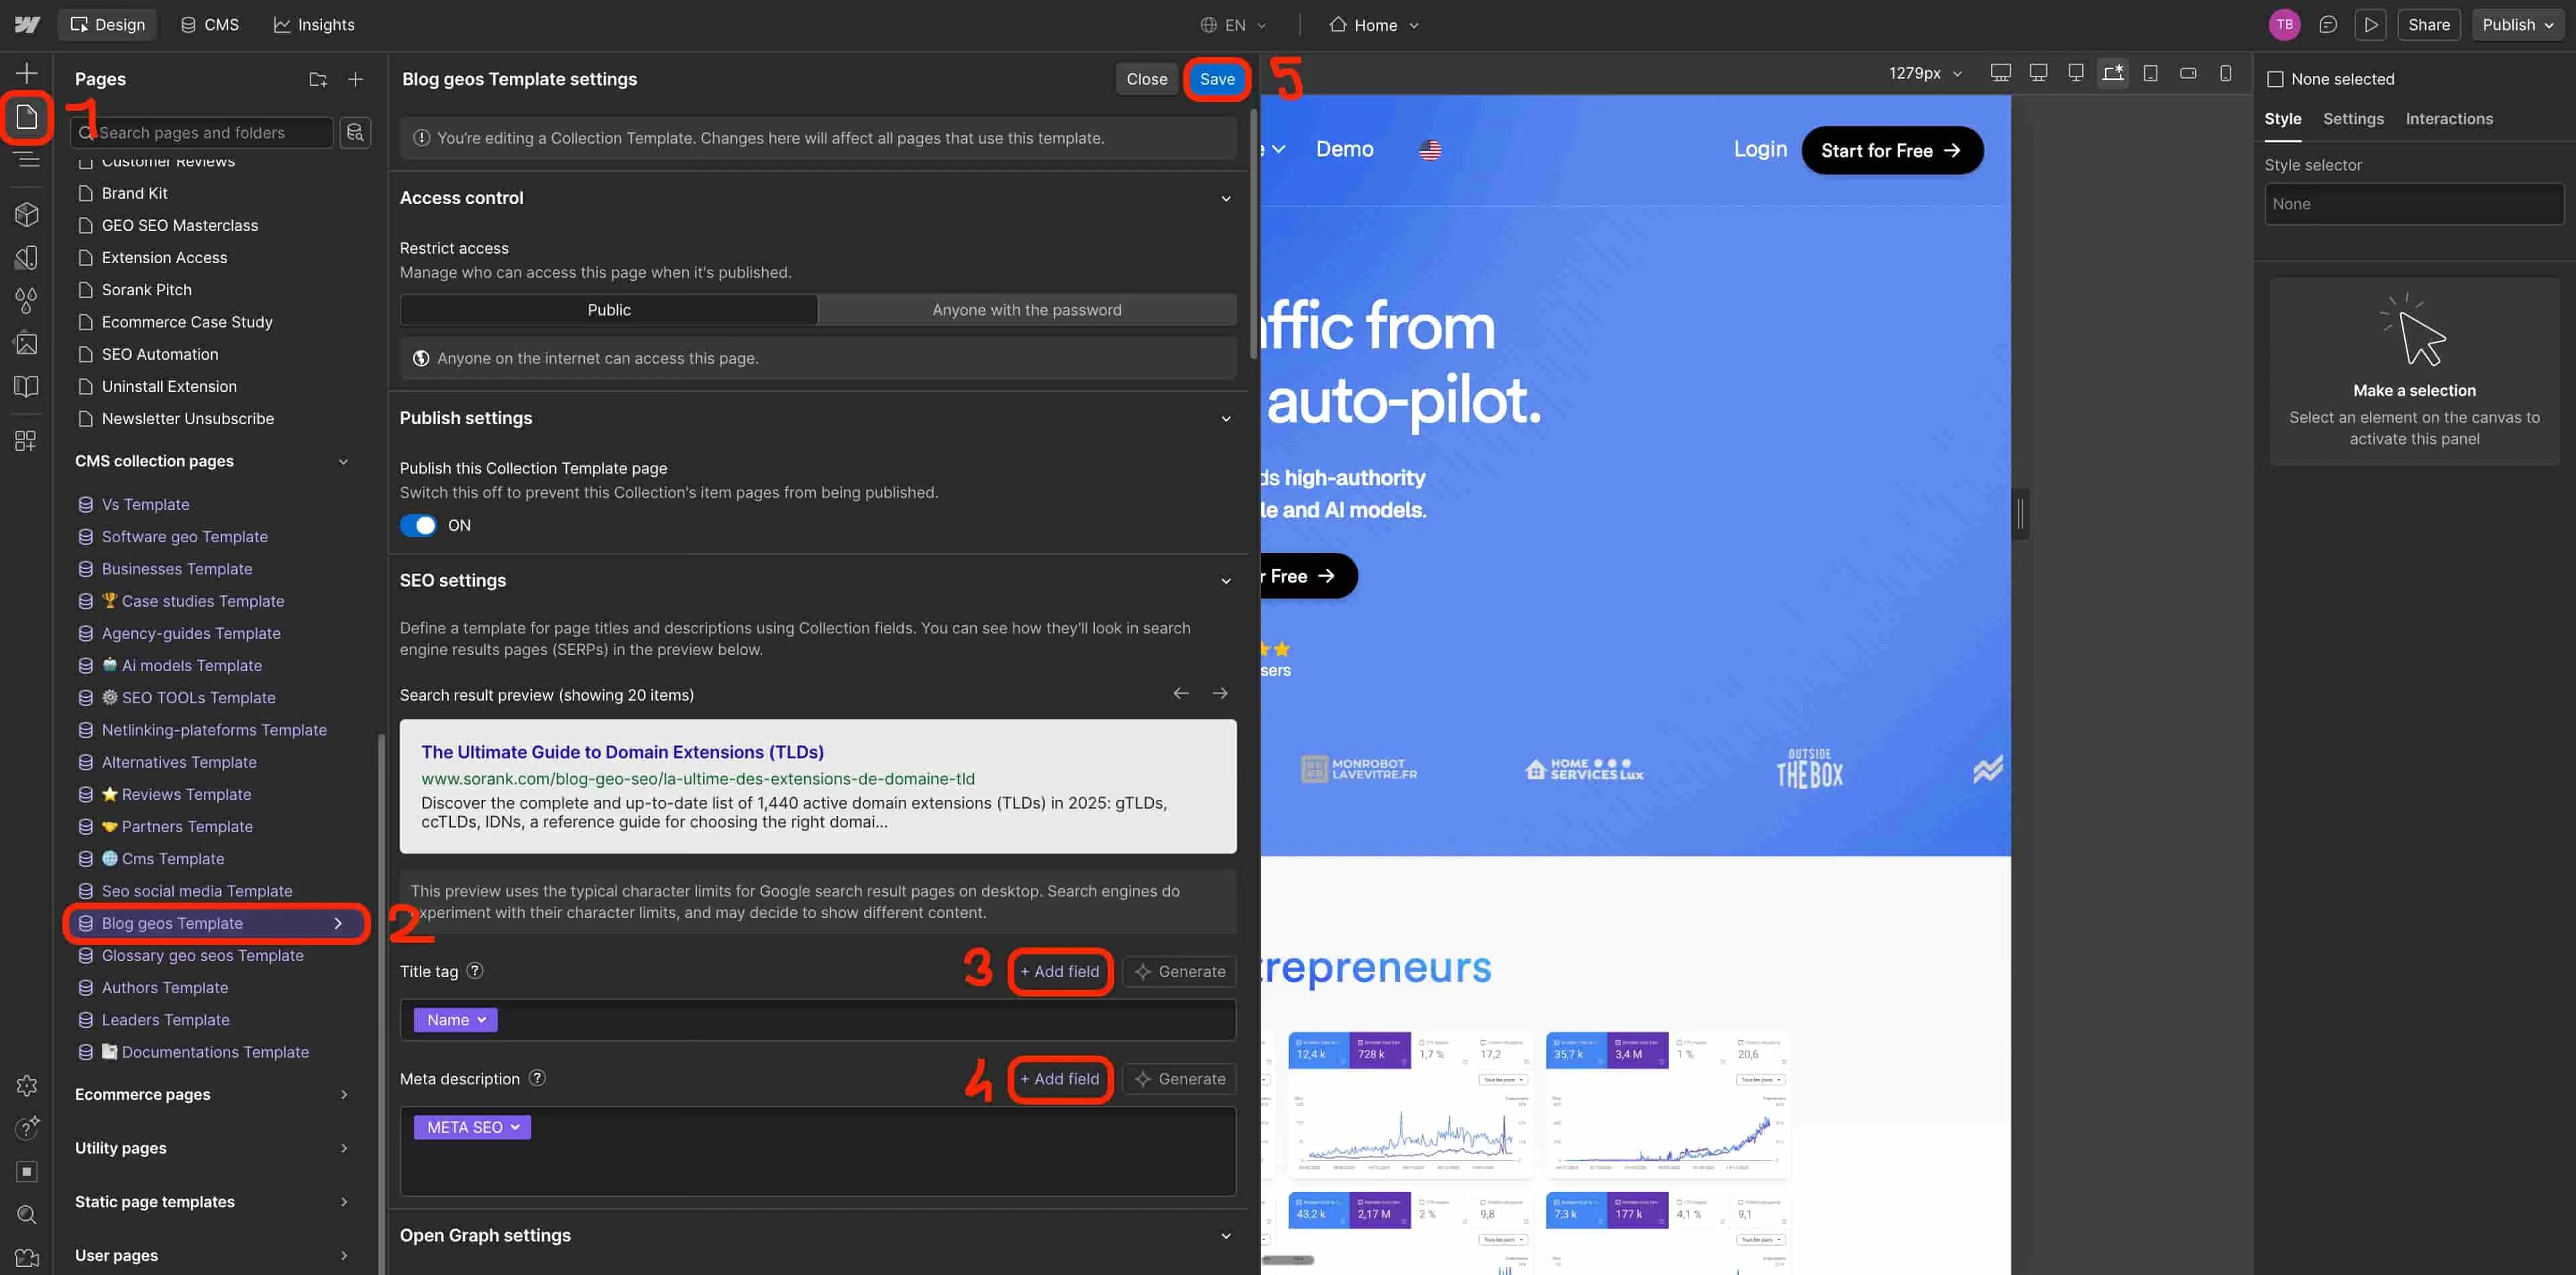 This ensures every article Sorank publishes gets its own unique title and meta description in Google search results.
## Step 5: Publish Your Webflow Site
Click **Publish** in the top-right corner of the Designer. Select your live domain and confirm. Your blog collection is now live and ready to receive articles from Sorank.
## Step 6: Connect Webflow to Sorank
Go to your Sorank account. Click **Publish** on any article, or go to [Publishing platforms](https://app.sorank.com/settings/integrations/publishing). Click **Webflow** then **Connect your CMS**. Authorize Sorank to access your Webflow account. Select your **Blog** collection. Map each Sorank field to the corresponding Webflow field. Click **Confirm setup**.
Every article you generate in Sorank can now be published directly to your Webflow blog in one click, with images, meta tags, and slug included.
This ensures every article Sorank publishes gets its own unique title and meta description in Google search results.
## Step 5: Publish Your Webflow Site
Click **Publish** in the top-right corner of the Designer. Select your live domain and confirm. Your blog collection is now live and ready to receive articles from Sorank.
## Step 6: Connect Webflow to Sorank
Go to your Sorank account. Click **Publish** on any article, or go to [Publishing platforms](https://app.sorank.com/settings/integrations/publishing). Click **Webflow** then **Connect your CMS**. Authorize Sorank to access your Webflow account. Select your **Blog** collection. Map each Sorank field to the corresponding Webflow field. Click **Confirm setup**.
Every article you generate in Sorank can now be published directly to your Webflow blog in one click, with images, meta tags, and slug included.